Manual Sensitivity Labels in Microsoft Purview help organizations classify and protect sensitive Microsoft 365 content using encryption, permissions, and access control policies.
Organizations handle sensitive business data every day across Microsoft 365 workloads, such as:
- Exchange Online
- SharePoint Online
- OneDrive
- Microsoft Teams
- Word and Excel documents
Without proper classification and protection, sensitive data can be:
- Shared accidentally
- Exposed externally
- Downloaded insecurely
- Sent without protection
- Accessed by unauthorized users
Microsoft Purview Sensitivity Labels help organizations classify and protect sensitive information using encryption, access control, and content protection policies.
For the MS-102: Microsoft 365 Administrator certification, understanding manual sensitivity labels is a critical Microsoft Information Protection skill.
In this guide, we’ll cover:
- What manual sensitivity labels are
- How Microsoft Information Protection works
- Label scopes and permissions
- Encryption & access control
- Publishing labels
- Manual labeling workflow
- Step-by-step Microsoft Purview lab
- Best practices
- Common mistakes
- MS-102 exam tips
Learning Objectives
After completing this guide, you will be able to:
- Explain the purpose of manual sensitivity labels in Microsoft Purview.
- Identify the types of sensitivity labels available.
- Configure a manual sensitivity label step-by-step.
- Describe common scenarios and best practices for manual labeling.
What are Manual Sensitivity Labels in Microsoft Purview Labels?
Manual sensitivity labels allow users or administrators to manually classify and protect Microsoft 365 content.
Labels can apply to:
- Emails
- Word documents
- Excel files
- PowerPoint presentations
- PDFs
- Microsoft 365 files
These labels help organizations:
- Protect confidential data
- Apply encryption
- Restrict access
- Add governance controls
- Improve compliance visibility
Why Manual Sensitivity Labels in Microsoft Purview Labels Matter
Manual labeling helps organizations:
- Secure sensitive information
- Reduce accidental exposure
- Improve governance
- Protect confidential business documents
- Apply encryption policies
- Support compliance requirements
This is one of the core Microsoft Information Protection capabilities in Microsoft Purview.
Administrators use Manual Sensitivity Labels in Microsoft Purview to secure confidential emails, Word documents, Excel files, and other Microsoft 365 workloads.
Manual Sensitivity Label Workflow
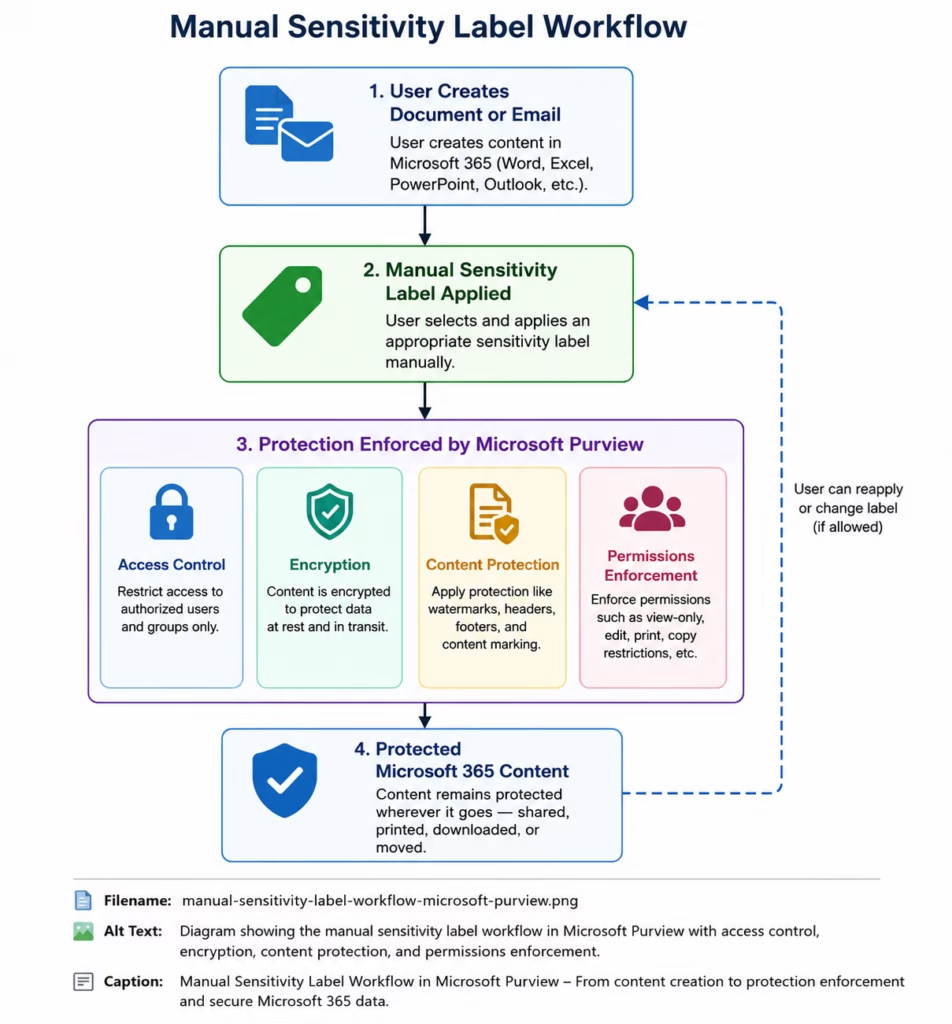
Manual Sensitivity Label workflow showing encryption, access control, permissions enforcement, and protected Microsoft 365 content using Microsoft Purview.
Types of Sensitivity Labels
Organizations commonly create labels such as:
| Label | Purpose |
|---|---|
| Internal Projects | Internal business documents |
| Client Confidential | Customer-related data |
| Finance Restricted | Financial records |
| Executive Confidential | Leadership-only content |
Using realistic labels improves enterprise governance.
How Manual Sensitivity Labels in Microsoft Purview Work
When a label is applied:
Microsoft Purview can:
- Encrypt content
- Restrict access
- Apply permissions
- Protect emails
- Protect Office files
- Enforce organizational policies
Labels remain attached to files even when documents move between locations.
Microsoft Purview Label Protection Features
Manual Sensitivity Labels in Microsoft Purview provide centralized information protection capabilities across Microsoft 365 services.
| Feature | Purpose |
|---|---|
| Access Control | Restrict unauthorized access |
| Encryption | Protect sensitive content |
| Content Marking | Add headers/watermarks |
| Permissions | Control who can open files |
| Policy Enforcement | Apply governance controls |
These capabilities help organizations secure sensitive information.
Step-by-Step Manual Sensitivity Label Lab
This manual labeling workflow demonstrates how Microsoft Purview sensitivity labels protect confidential Microsoft 365 files and emails.
This section provides practical MS-102 administration experience.
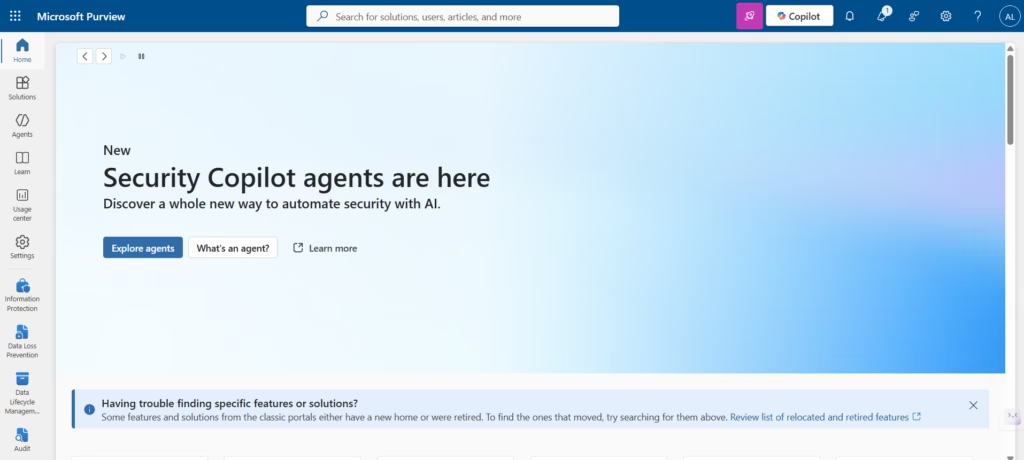
Step 1: Open Microsoft Purview Portal
Go to:
compliance.microsoft.comSign in using:
- Global Administrator
- Compliance Administrator
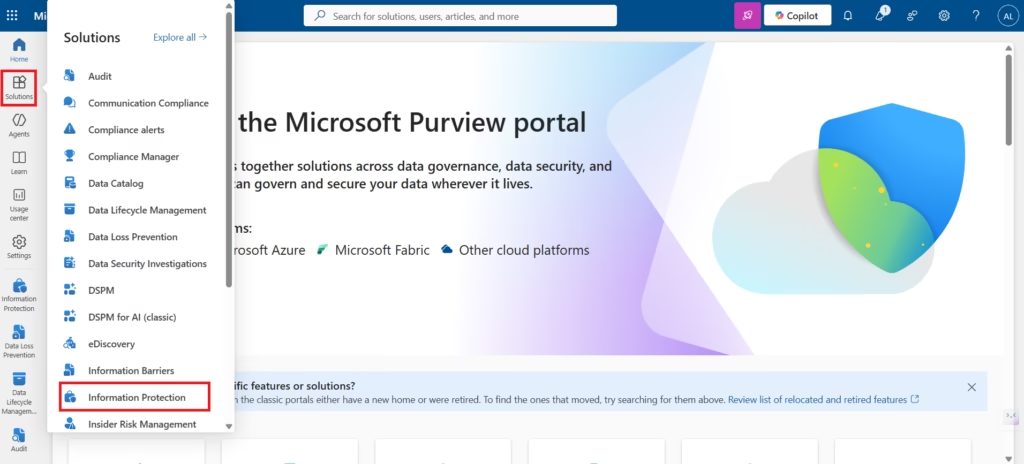
Step 2: Open Sensitivity Labels
Navigate to:
Information Protection → Sensitivity labelsReview the sensitivity label management interface, including:
- Create a label
- Publish labels
- Label configuration options
- Protection settings
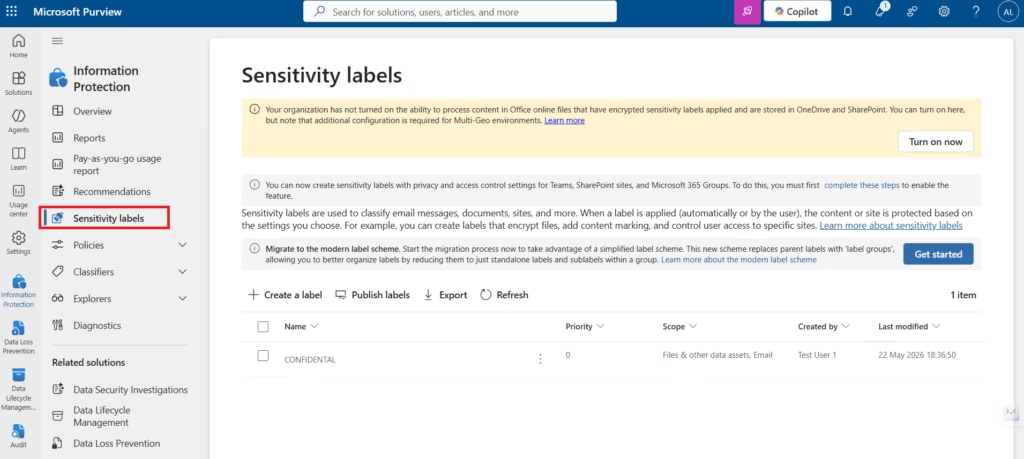
In new Microsoft 365 lab tenants, labels may need to be created manually before deployment.
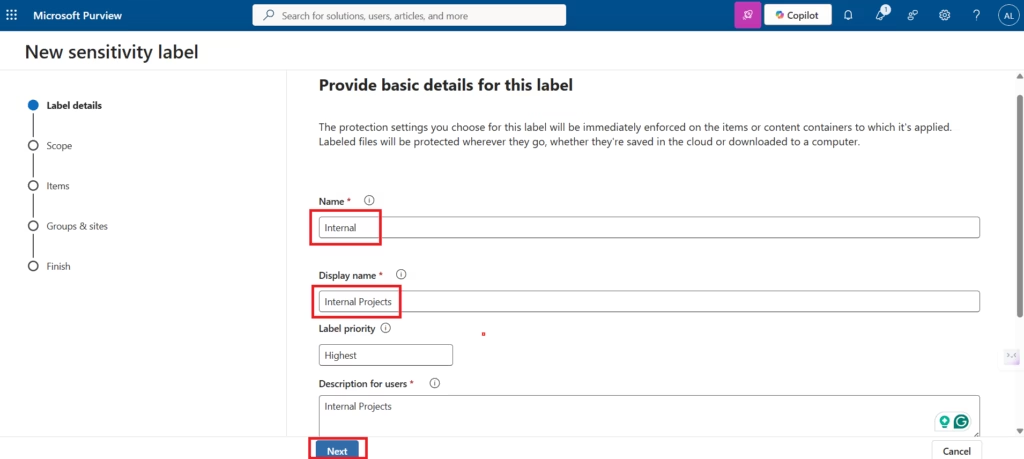
Step 3: Create a New Sensitivity Label
Select:
Create a labelConfigure:
- Label name
- Description
- Color
- Scope
Example labels:
- Internal Projects
- Client Confidential
- Finance Restricted
These labels help organizations classify sensitive business data.
Step 4: Configure Label Scope
Enable supported workloads such as:
- Emails
- Files and data assets
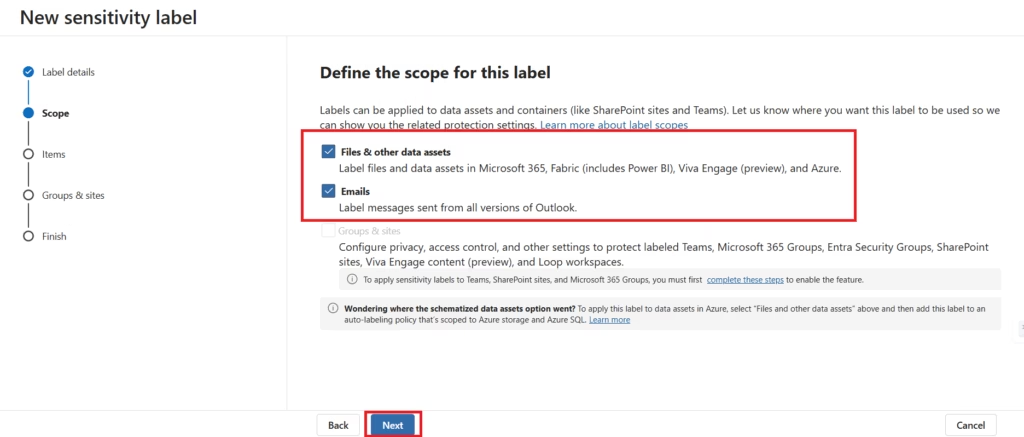
In some Microsoft 365 lab environments, certain Groups & Sites protection settings may appear unavailable until additional Microsoft Entra and Microsoft 365 integrations are configured.
For this foundational lab, the focus remains on protecting files and emails.
Step 5: Configure Protection Settings
Configure protection settings such as:
- Access control permissions
- Authorized users/groups
- Content protection
- Access restrictions
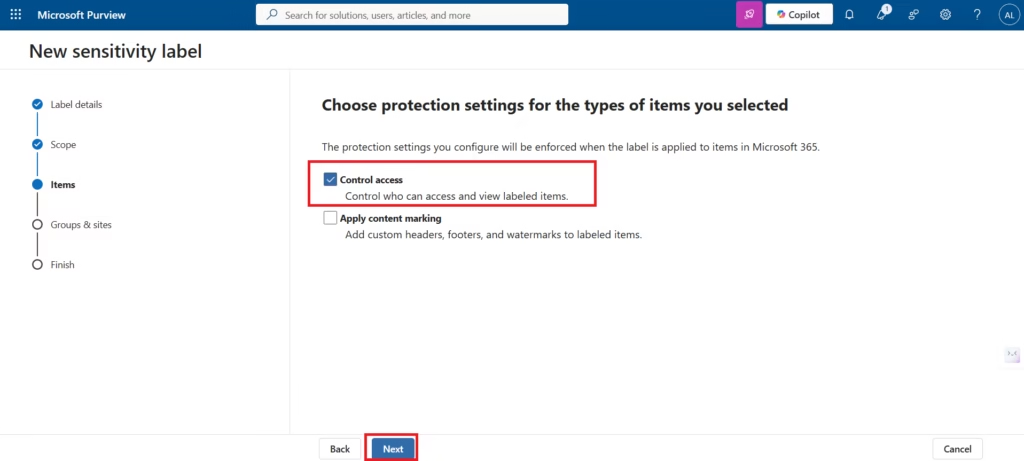
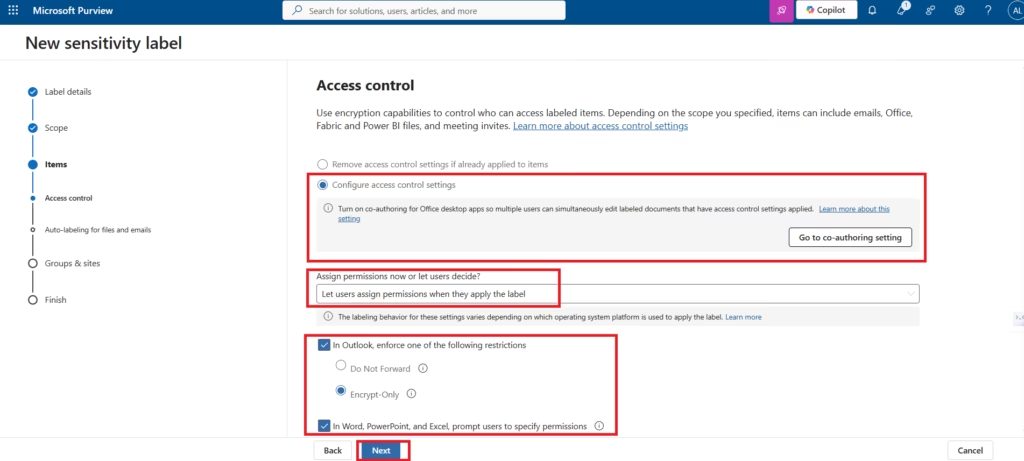
Microsoft Purview uses access control policies within sensitivity labels to apply Microsoft Information Protection encryption and protect content from unauthorized access.
Step 6: Configure Content Protection
Optionally configure:
- Watermarks
- Headers
- Footers
For this foundational Microsoft Information Protection lab, content marking is not enabled to keep the configuration simple and focused on manual sensitivity label deployment.
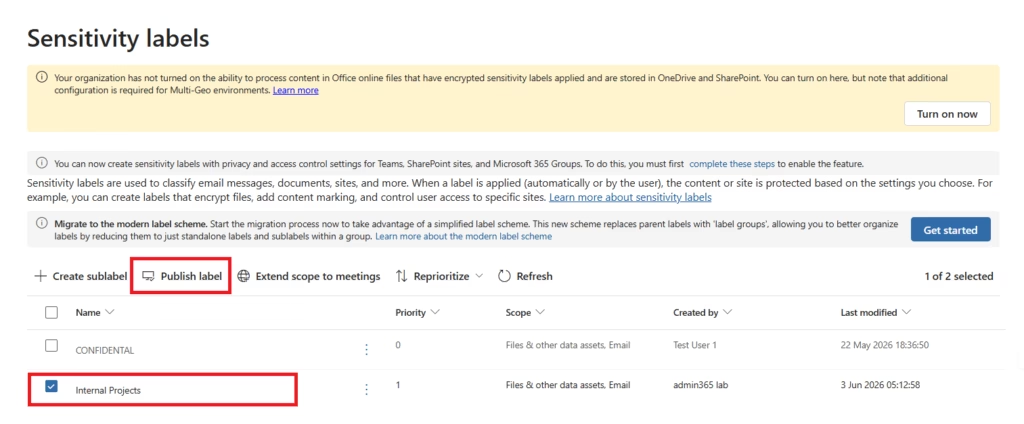
Step 7: Publish the Sensitivity Label
Select:
Publish labelsAssign the label to:
- Users
- Groups
- Administrative units

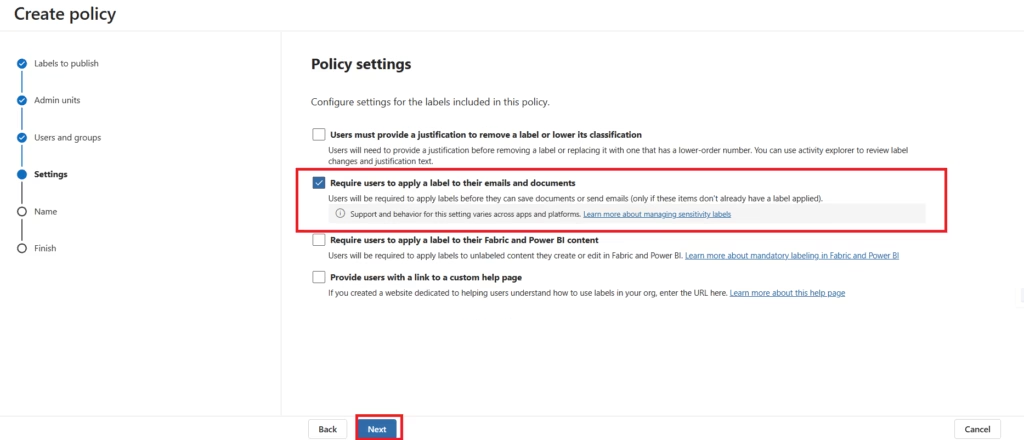
Enable:
Require users to apply a label to their emails and documentsThis helps organizations enforce information classification policies.
Step 8: Wait for Policy Synchronization
After publishing sensitivity labels, Microsoft 365 may require additional synchronization time before labels appear across Office applications and Microsoft 365 services.
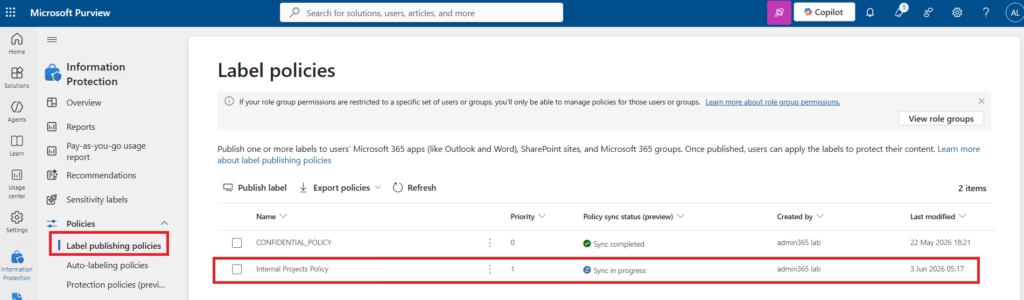
This is common in new Microsoft 365 lab tenants.
Step 9: Apply the Sensitivity Label
Open:
- Word
- Excel
- Outlook
Select:
SensitivityApply the newly created label.
Verify:
- Label visibility
- Protection behavior
- Access restrictions
This validates Microsoft Information Protection functionality.
Step 10: Test Protected Content
Save the protected document.
Verify:
- Restricted access behavior
- Protected email functionality
- Permission enforcement
- Label persistence
This confirms Microsoft Information Protection is functioning correctly.
Common Manual Sensitivity Label Scenarios
| Scenario | Recommended Label |
|---|---|
| Internal project files | Internal Projects |
| Financial spreadsheets | Finance Restricted |
| Client documentation | Client Confidential |
| Executive reports | Executive Confidential |
These are common enterprise governance scenarios.
Best Practices for Manual Sensitivity Labels
Organizations should test Microsoft Purview sensitivity labels carefully before deploying information protection policies organization-wide.
- Keep Label Names Simple
- Users should immediately understand classification levels.
- Avoid Too Many Labels
- Excessive labels create confusion.
- Start with Manual Labels First
- Manual labeling helps organizations learn classification workflows before implementing automation.
- Use Realistic Business Scenarios
- Enterprise-style labels improve adoption and governance.
- Test Policies Before Production Deployment
- Always validate label behavior before organization-wide rollout.
Common Administrator Mistakes
Many administrators incorrectly assume Microsoft 365 sensitivity labels synchronize instantly across all Office applications.
- Creating Overly Complex Labels
- Too many classification levels confuse users.
- Applying Excessive Restrictions
- Overly restrictive permissions reduce collaboration.
- Ignoring User Training
- Users must understand how and when to apply labels.
- Expecting Instant Synchronization
- Microsoft Purview policy synchronization may require additional time.
MS-102 Exam Tip
Scenario:
“A company wants employees to manually classify and protect confidential emails and Office documents using Microsoft Purview.”
Correct answer:
Sensitivity LabelsNOT:
- Retention Policies
- Conditional Access
- Microsoft Defender XDR
This is a common MS-102 exam scenario.
Why Manual Sensitivity Labels Matter
Manual sensitivity labels help organizations:
- Protect sensitive data
- Apply Microsoft Information Protection
- Improve governance
- Restrict unauthorized access
- Secure Microsoft 365 collaboration
- Support compliance requirements
They are foundational for enterprise information protection strategies.
Final Thoughts
Manual sensitivity labels are one of the most important Microsoft Information Protection capabilities in Microsoft Purview.
They help organizations classify and protect sensitive information while enabling secure collaboration across Microsoft 365 workloads.
For MS-102 administrators, understanding manual sensitivity labels is essential because modern Microsoft 365 administration includes information governance, encryption, and compliance protection.
Organizations must protect not only identities and devices—but also the information itself.
Conclusion
Manual Sensitivity Labels in Microsoft Purview are essential for protecting sensitive organizational data and improving Microsoft 365 compliance and governance.Next in the Microsoft Purview Series
Automatic Sensitivity Labels in Microsoft Purview
Previous Post
Microsoft Information Protection: Sensitivity Labels & Data Classification in Microsoft Purview (MS-102 Lab Guide)
Start from the Beginning
MS-102 Microsoft 365 Administrator Overview
https://techcertguide.blog/ms-102-microsoft-365-administration
Official Microsoft Reference
https://learn.microsoft.com/en-us/credentials/certifications/exams/ms-102
1 thought on “Ultimate Manual Sensitivity Labels in Microsoft Purview (MS-102 Lab Guide)”