As organizations generate massive amounts of data across Microsoft 365, relying solely on users to manually classify information becomes difficult.
Employees may forget to apply sensitivity labels, resulting in confidential documents and emails being left unprotected.
Automatic Sensitivity Labels in Microsoft Purview help organizations automatically detect sensitive information and apply protection policies without user intervention.
This enables consistent data classification, stronger compliance, and automated information protection across Microsoft 365 workloads.
In this guide, you’ll learn:
- What Automatic Sensitivity Labels in Microsoft Purview are
- How Auto-Labeling works
- Sensitive Information Types
- Trainable Classifiers
- Recommended vs Automatic Labeling
- Microsoft Purview Auto-Labeling Workflow
- Best Practices
- Common Mistakes
- MS-102 Exam Tips
Learning Objectives
After completing this guide, you will be able to:
- Explain how automatic sensitivity labels reduce reliance on manual classification.
- Describe the automatic labeling architecture and workflow.
- Identify sensitive information types and trainable classifiers.
- Configure automatic sensitivity labels in a lab scenario.
What Are Automatic Sensitivity Labels in Microsoft Purview?
Automatic Sensitivity Labels in Microsoft Purview allow Microsoft Purview to automatically classify and protect content when predefined conditions are met.
Instead of relying on users to manually select labels, Microsoft Purview evaluates content and applies protection policies automatically.
Examples include:
- Credit card numbers
- Passport numbers
- Banking information
- Personal identifiers
- Financial records
- Internal confidential documents
Why Automatic Labeling Matters
Manual classification is effective but not always reliable.
Users may:
- Forgot to apply labels
- Apply incorrect labels
- Accidentally expose sensitive data
Automatic Sensitivity Labels in Microsoft Purview help organizations:
- Reduce human error
- Improve compliance
- Standardize data protection
- Protect sensitive information at scale
- Automate governance controls
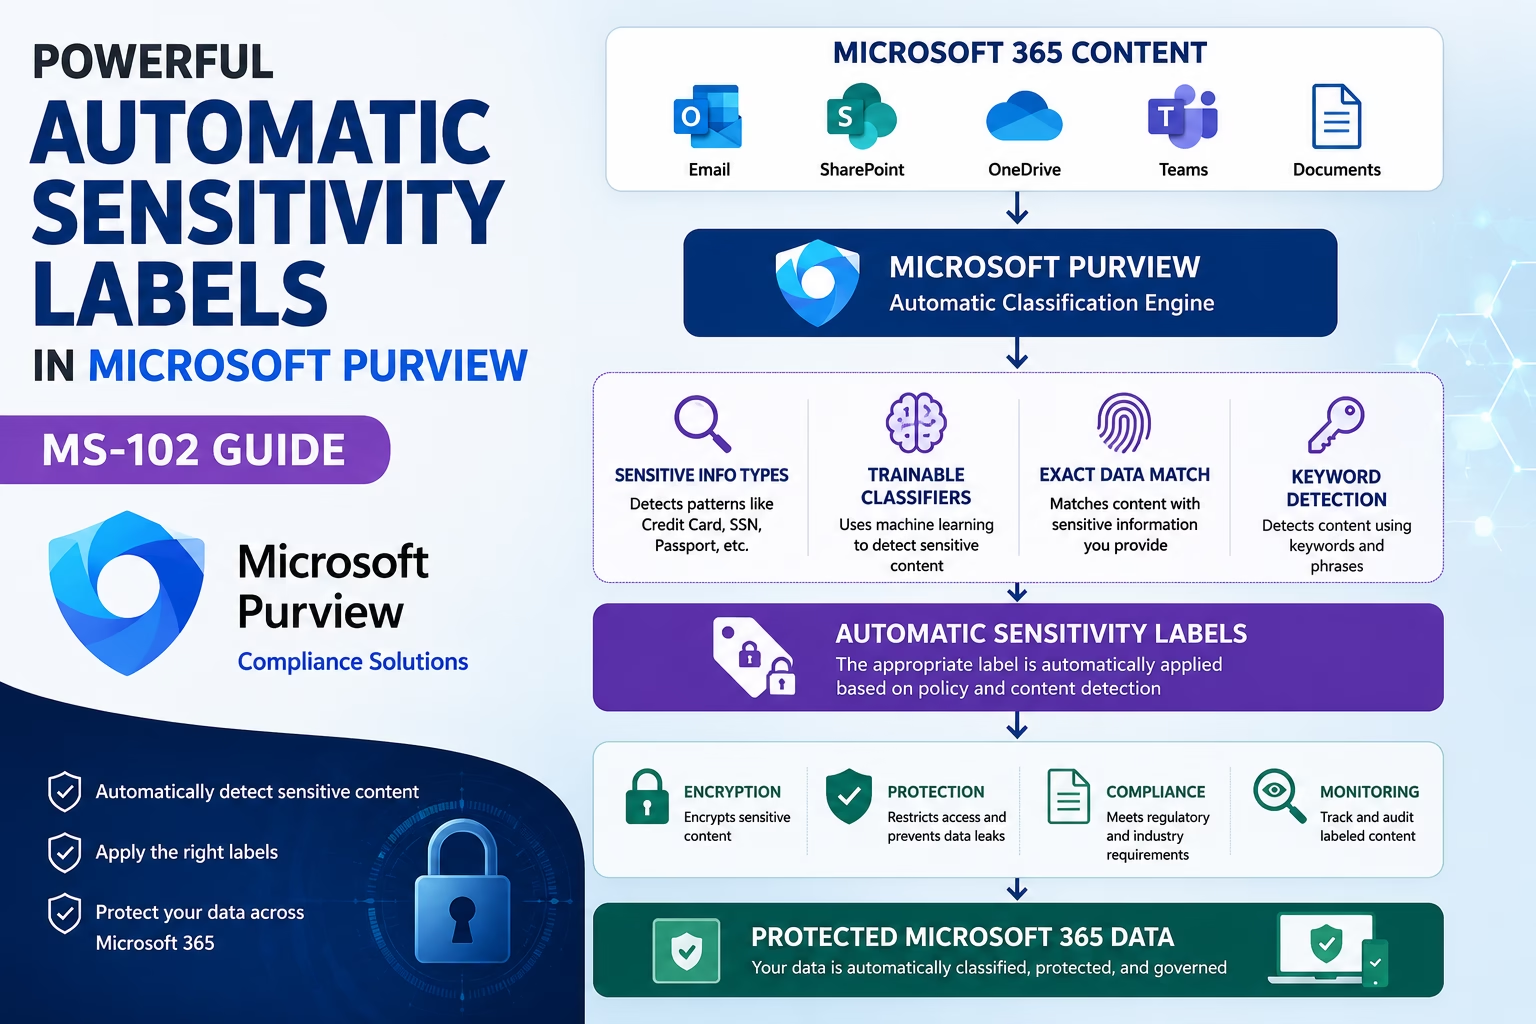
Automatic Sensitivity Labels in Microsoft Purview Architecture
Automatic Sensitivity Labels architecture showing Microsoft Purview automatically detecting sensitive information and applying protection policies across Microsoft 365 workloads.
How Automatic Sensitivity Labels in Microsoft Purview Work
Microsoft Purview follows a multi-stage classification process.
Step 1: Content Creation
Users create:
- Emails
- Word documents
- Excel files
- PowerPoint presentations
- SharePoint files
Step 2: Content Inspection
Microsoft Purview scans content using:
- Sensitive Information Types
- Keywords
- Metadata
- Trainable Classifiers
Step 3: Policy Evaluation
Purview compares detected information against Auto-Labeling Policies.
Step 4: Label Application
Depending on policy configuration:
- Recommend a label
- Automatically apply a label
Step 5: Protection Enforcement
The applied label can trigger:
- Encryption
- Access restrictions
- Content marking
- Compliance controls
Step-by-Step Automatic Sensitivity Labels in Microsoft Purview Lab
Step 1: Open Microsoft Purview Portal
Navigate to:
https://purview.microsoft.com/Sign in using:
- Global Administrator
- Compliance Administrator
Step 2: Review Sensitive Information Types
Navigate to:
Information Protection → Classifiers → Sensitive Info TypesReview built-in detection patterns such as:
- Credit Card Number
- Passport Number
- Bank Account Number
- Financial Data
These detection patterns are used by Automatic Sensitivity Labels.
Suggested Screenshot:
Sensitive Info Types page.
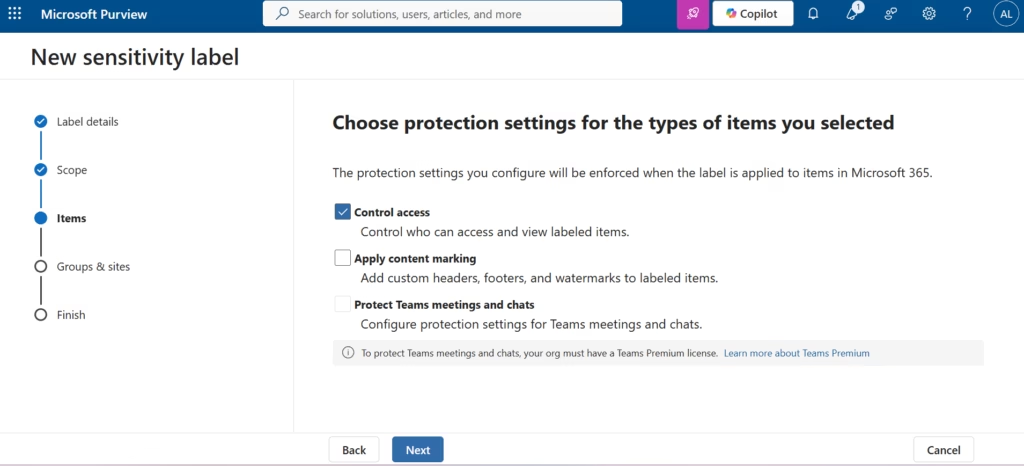
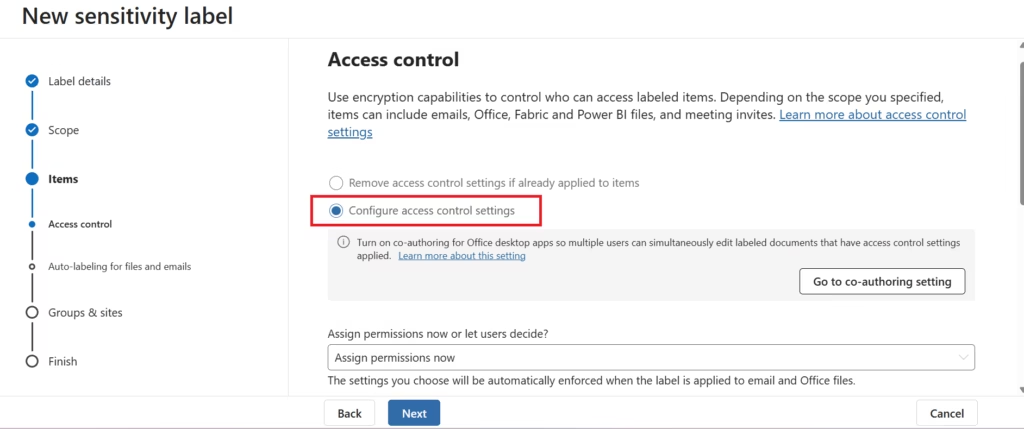
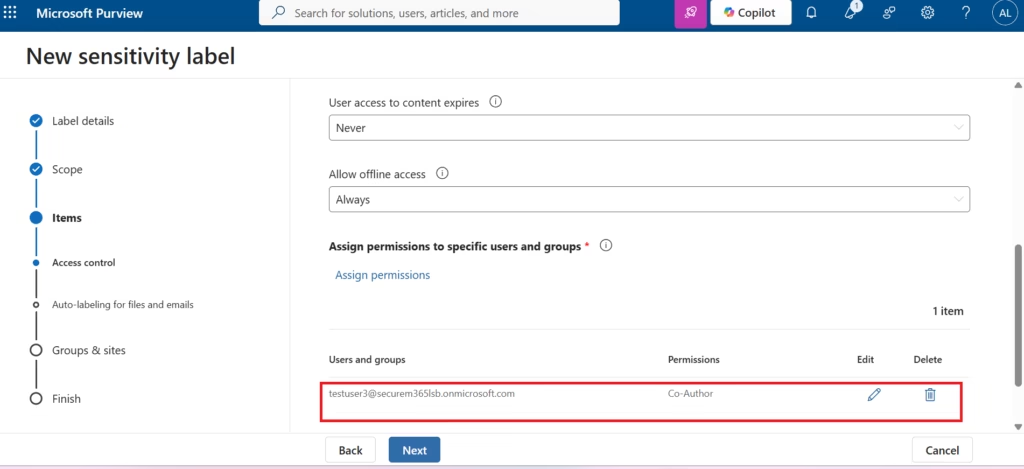
Step 3: Create a Sensitivity Label
Navigate to:
Information Protection → Sensitivity LabelsSelect:
Create a Label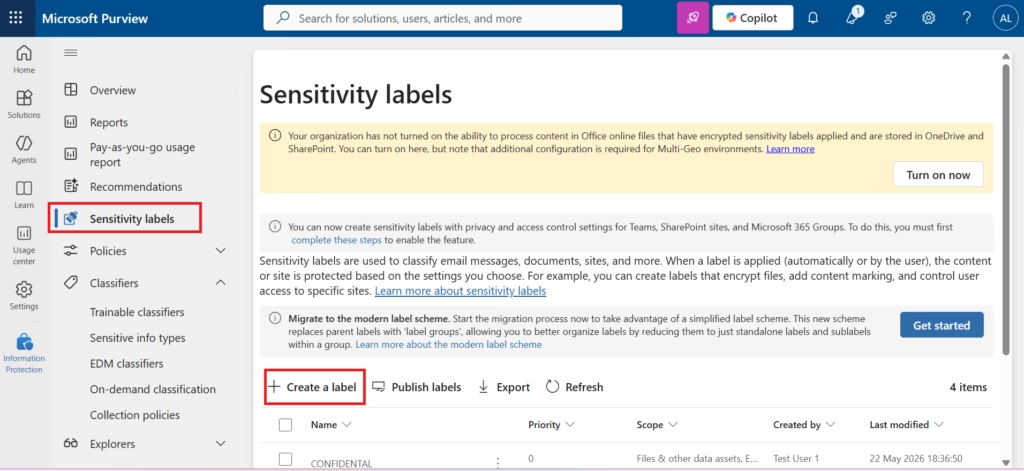
Example:
Finance Confidential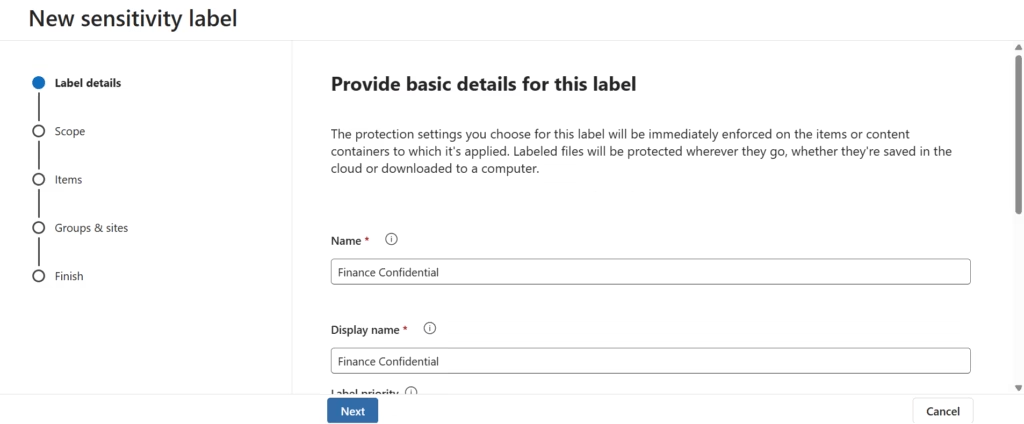
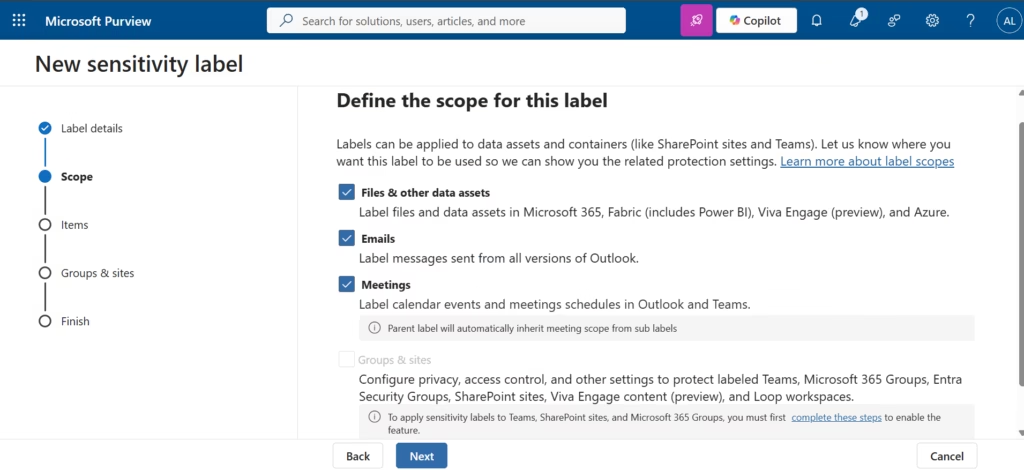
Publish the label.
Step 4: Publish the Sensitivity Label
Navigate to:
Information Protection → Label Policies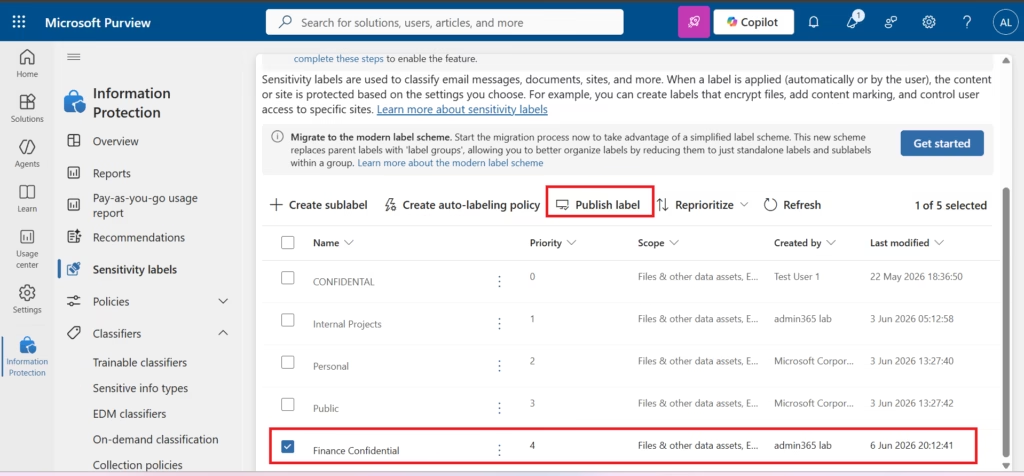
Publish the label to:
- Users
- Groups
- Microsoft 365 workloads
Wait for policy synchronization.
Suggested Screenshot:
Label Policy configuration.
Step 5: Create an Auto-Labeling Policy
Navigate to:
Information Protection → Auto-labelingSelect:
Create Auto-labeling Policy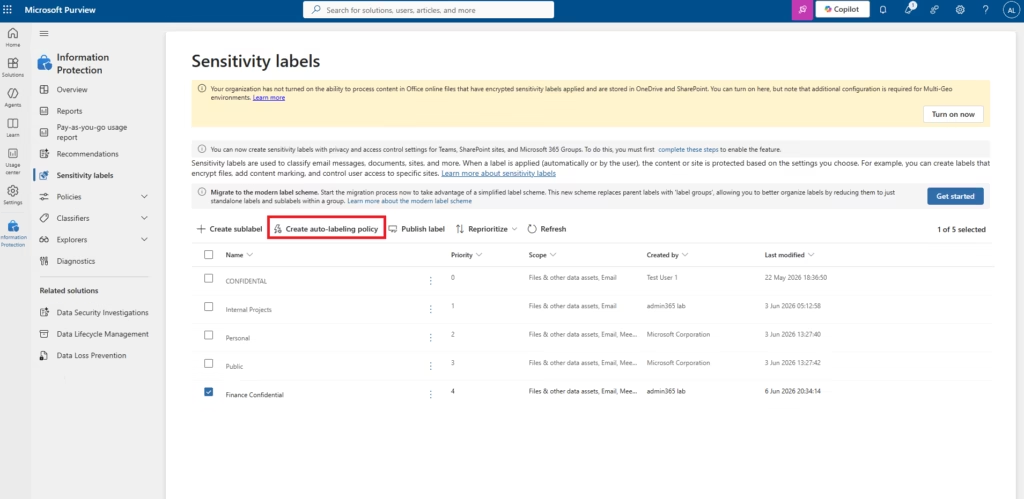
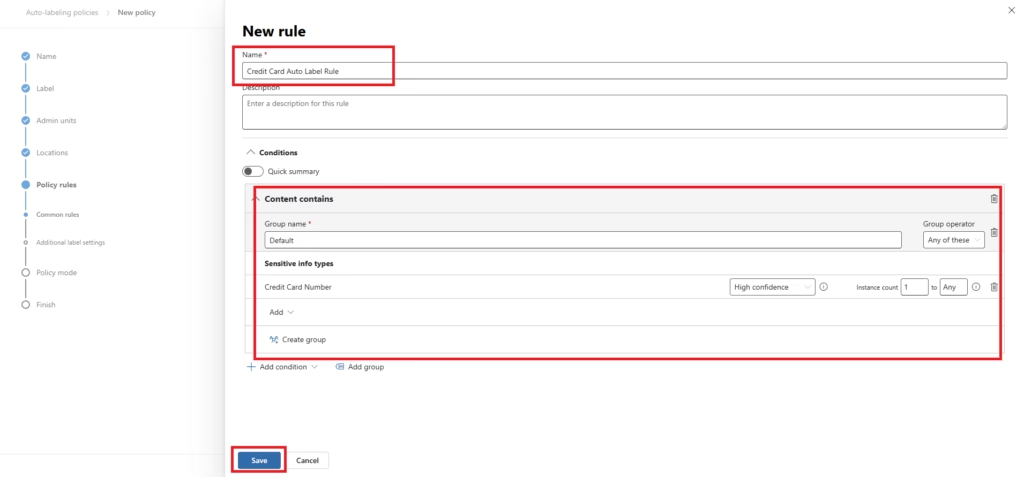
For this lab, I configured an Auto-Labeling Policy that detects Credit Card Numbers using Microsoft Purview Sensitive Information Types. When at least one valid credit card number is detected, the Finance Confidential sensitivity label is automatically applied.
Choose:
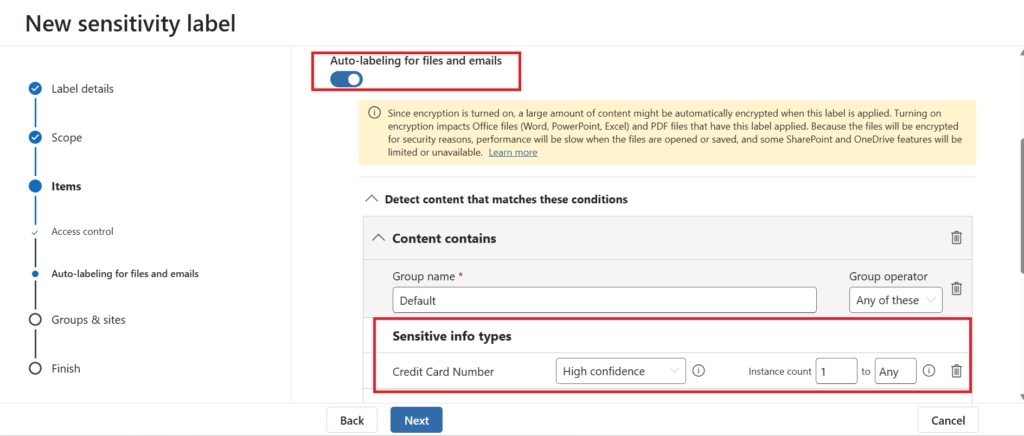
Apply a Sensitivity LabelStep 6: Configure Detection Rules
Select:
Sensitive Information TypesExample:
Credit Card NumberConfigure:
1 instance detectedApply label:
Finance ConfidentialSuggested Screenshot:
Condition configuration screen.
Step 7: Select Labeling Mode
Choose one:
| Mode | Purpose |
|---|---|
| Simulation | Test policy |
| Recommended | Suggest label |
| Automatic | Apply automatically |
For production environments:
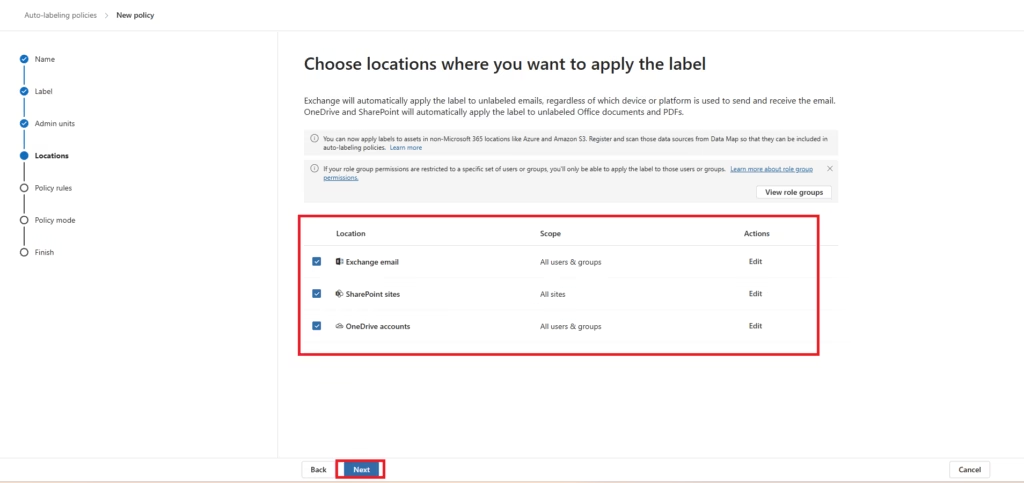
Start with Simulation ModeStep 8: Choose Locations
Select workloads:
- Exchange Online
- SharePoint Online
- OneDrive
- Microsoft Teams
This determines where Microsoft Purview scans content.
Step 9: Review and Create Policy
Review:
- Detection Rules
- Label Selection
- Locations
- Policy Mode
Select:
Create PolicyStep 10: Validate Auto-Labeling
Create a test document containing:
4111-1111-1111-1111(or another test pattern)
Verify:
- Detection occurs
- The label is applied
- Protection is enforced
Suggested Screenshot:
Labeled document or Activity Explorer result.
Important Note for Your Blog:
If your current tenant doesn’t show:
Information Protection → Auto-labelingThen add this note:
Automatic Sensitivity Labels require appropriate Microsoft Purview licensing. Some Microsoft 365 E3 environments may not display Auto-labeling policies without additional Microsoft Purview or Microsoft 365 E5 compliance capabilities.
This keeps the blog technically accurate and prevents readers from getting confused.
For your MS-102 sequence, this lab section makes the Auto-Labeling post much stronger before you move on to Retention Policies in Microsoft Purview.
Sensitive Information Types
Sensitive Information Types are the foundation of Automatic Sensitivity Labels.
Examples include:
| Sensitive Information Type | Example |
|---|---|
| Credit Card Numbers | Payment data |
| Passport Numbers | Identity documents |
| Bank Account Numbers | Financial records |
| Tax Identifiers | Compliance data |
| Healthcare Records | Medical information |
| Personal Information | Employee data |
Microsoft provides hundreds of built-in detection templates.
Trainable Classifiers
Microsoft Purview also supports AI-powered Trainable Classifiers.
These classifiers identify content such as:
- Contracts
- Resumes
- Source code
- Financial documents
- HR records
- Business communications
Unlike keyword matching, Trainable Classifiers understand document context.
Recommended Labeling vs Automatic Labeling
| Feature | Recommended Labeling | Automatic Labeling |
|---|---|---|
| User Approval Required | Yes | No |
| User Receives Prompt | Yes | No |
| Fully Automated | No | Yes |
| Ideal for Initial Deployment | Yes | No |
| Ideal for Mature Environments | No | Yes |
Most organizations begin with Recommended Labeling before enabling Automatic Labeling.
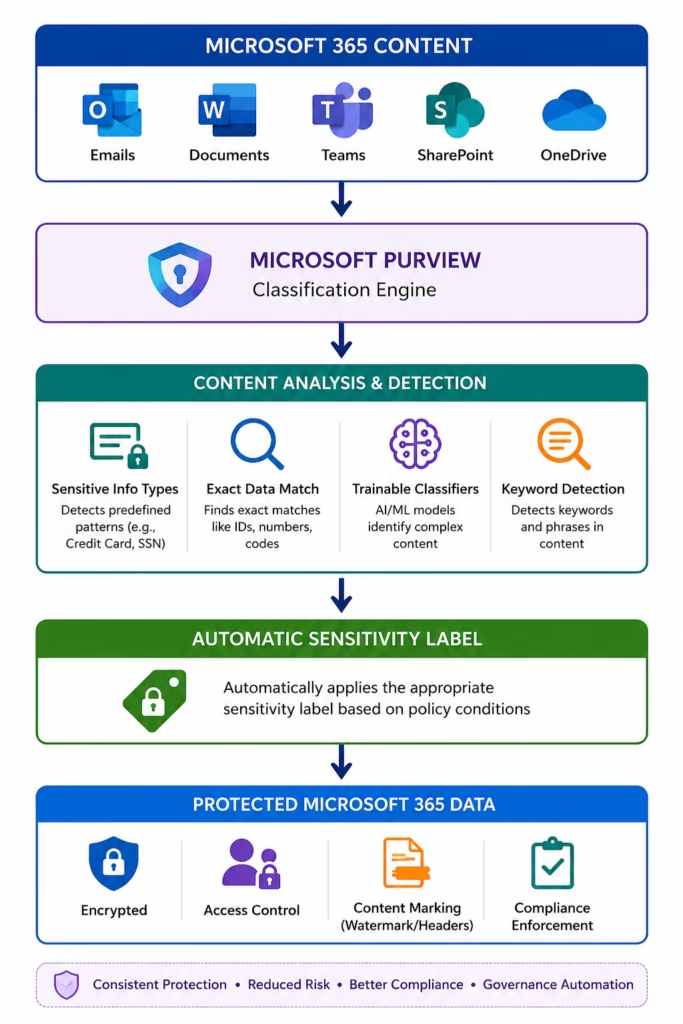
Automatic Sensitivity Label Workflow
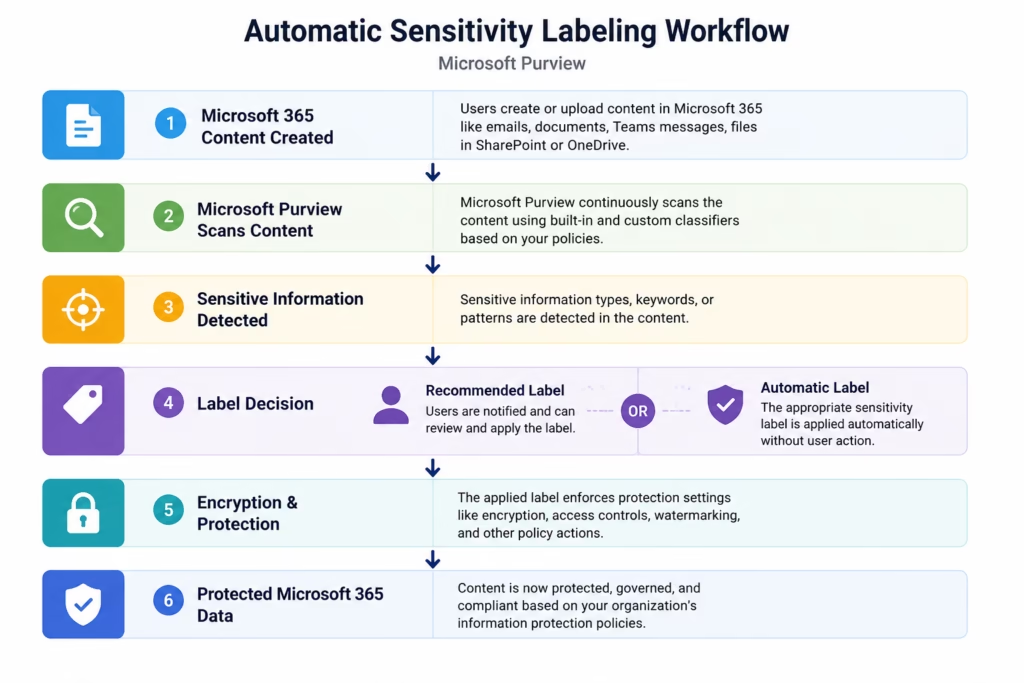
Automatic Sensitivity Label workflow demonstrating detection, classification, encryption, and protection of Microsoft 365 content.
Common Auto-Labeling Scenarios
Finance Department
Detect:
- Credit card numbers
- Banking information
Apply:
Finance Restricted
Human Resources
Detect:
- Employee records
- Personal information
Apply:
HR Confidential
Legal Department
Detect:
- Contracts
- Legal documents
Apply:
Legal Confidential
Customer Data
Detect:
- Client identifiers
- Customer records
Apply:
Client Confidential
Benefits of Automatic Sensitivity Labels in Microsoft Purview
- Improved Security
- Sensitive information receives protection automatically.
- Reduced Human Error
- Users no longer need to manually classify every document.
- Better Compliance
- Organizations maintain consistent protection policies.
- Scalable Information Protection
- Large environments can classify thousands of documents automatically.
- Governance Automation
- Microsoft Purview continuously enforces protection policies.
Best Practices
- Start with Recommended Labeling
- Validate detection accuracy before enabling automatic enforcement.
- Test Policies Carefully
- Use pilot users before organization-wide deployment.
- Review Activity Explorer
- Monitor policy effectiveness regularly.
- Use Business-Relevant Classifiers
- Align policies with organizational requirements.
- Minimize False Positives
- Avoid overly broad keyword-based rules.
Common Administrator Mistakes
- Enabling Automatic Enforcement Too Early
- Always begin with testing and validation.
- Using Generic Keywords
- Broad keywords can generate false positives.
- Ignoring User Education
- Users should understand classification policies.
- Not Monitoring Detection Results
- Regular reviews improve policy accuracy.
Licensing Considerations
Automatic Sensitivity Labels may require:
- Microsoft 365 E5
- Microsoft Purview Information Protection
- Microsoft Purview Compliance solutions
Always verify licensing before deployment.
MS-102 Exam Tip
Scenario:
“A company wants Microsoft 365 to automatically classify and protect documents containing financial information.”
Correct Answer:
Automatic Sensitivity LabelsNot:
- Retention Policies
- Conditional Access
- Microsoft Defender XDR
This is a common MS-102 exam objective.
Why Automatic Sensitivity Labels Matter
Automatic Sensitivity Labels in Microsoft Purview help organizations automatically detect, classify, and protect sensitive information without relying on manual user actions.
They improve security, compliance, governance, and scalability across Microsoft 365 environments.
Conclusion
Automatic Sensitivity Labels in Microsoft Purview enable organizations to automatically identify sensitive information, apply protection policies, and enforce compliance controls across Microsoft 365 workloads using intelligent classification and automated information protection.
Next in the Microsoft Purview Series
Retention Policies in Microsoft Purview: Data Lifecycle Management (MS-102 Lab Guide)
https://techcertguide.blog/retention-policies-in-microsoft-purview
Previous Post:
Ultimate Microsoft Information Protection (MIP) Guide: Sensitivity Labels & Data Classification (MS-102)
Start from the Beginning
MS-102 Microsoft 365 Administrator Overview
https://techcertguide.blog/ms-102-microsoft-365-administration
Official Microsoft Reference
https://learn.microsoft.com/en-us/credentials/certifications/exams/ms-102
2 thoughts on “Powerful Automatic Sensitivity Labels in Microsoft Purview (MS-102 Guide)”