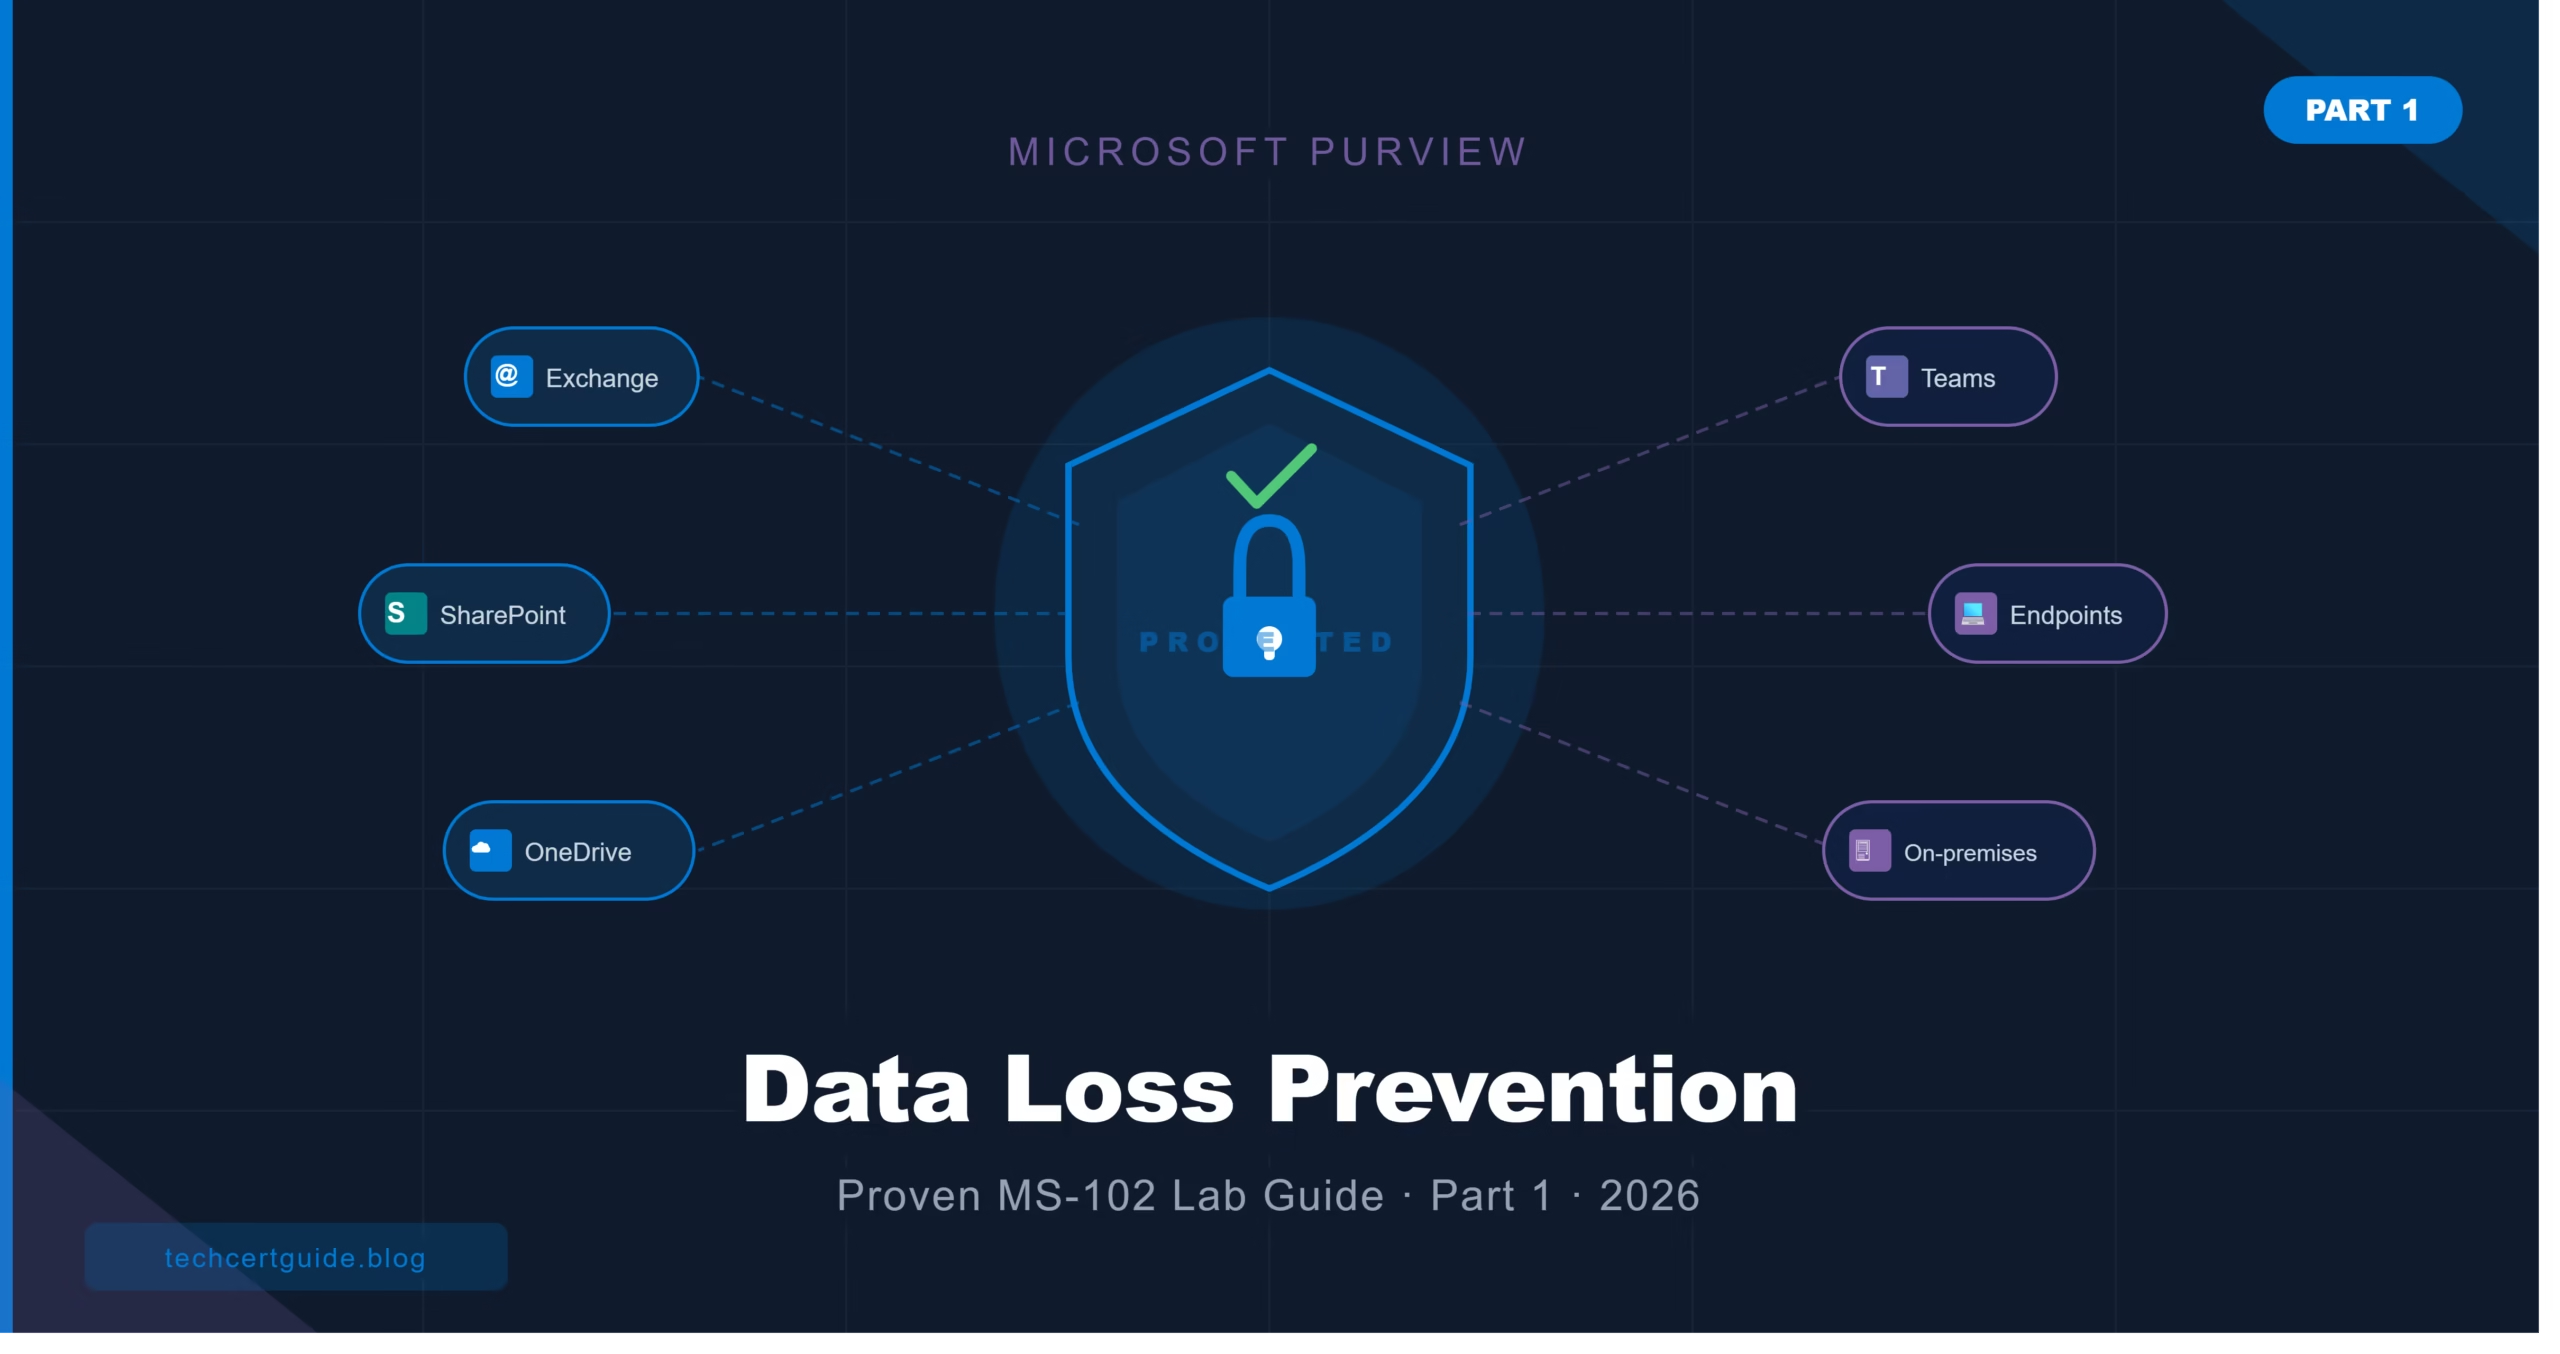
Your organization’s finance team just emailed a spreadsheet containing 400 credit card numbers to an external vendor, and nobody noticed. Without DLP, that kind of leak is invisible until it becomes a headline.
In this guide, Part 1 of a 3-part Microsoft Purview DLP series, you’ll learn:
- What Data Loss Prevention does in Microsoft 365
- Which workloads DLP protects, and how the architecture works
- How to create a custom DLP policy from scratch, step by step
- How to configure a rule, select a built-in Sensitive Information Type, and enable user notifications
- How to deploy in Simulation mode and verify the policy syncs successfully
- MS-102 exam tips for the DLP domain
Series navigation: Part 1 You are here: Create your first DLP policy Part 2: Custom Sensitive Information Types and Activity Explorer Part 3: DLP Alerts, Reports, and switching to Enforce mode
Learning Objectives
After completing this guide, you will be able to:
- Explain what Data Loss Prevention (DLP) does in Microsoft 365.
- Identify which workloads Microsoft Purview DLP protects.
- Describe the three-layer DLP architecture.
- Configure a custom DLP policy step-by-step.
What is Microsoft Purview Data Loss Prevention?
Microsoft Purview DLP is a policy engine that scans your Microsoft 365 environment for sensitive information and automatically enforces rules to prevent that data from being leaked, shared externally, or misused.
Where sensitivity labels protect individual files, DLP protects content in motion. It monitors email, Teams messages, SharePoint uploads, OneDrive shares, and activity on managed endpoints. When it detects a pattern match a credit card number, a passport number, a custom-defined keyword it can block the action, display a real-time warning to the user, notify an administrator, or silently log the event for later review.
The most important thing to understand about DLP: it is not a set-and-forget firewall. It is a detection and education tool. Done well, it changes the behavior of your users before a breach happens, not after.
Why Microsoft Purview DLP Matters for Microsoft 365 Admins
Most data breaches are not the result of sophisticated attacks. They happen because a well-meaning employee attaches the wrong file to an email, shares a folder with “Everyone,” or copies sensitive data into a Teams chat for convenience. DLP closes these gaps automatically.
For MS-102, Microsoft Purview DLP is a significant exam domain. Microsoft expects you to know how to design policies that balance protection with productivity when to block, when to notify, and when to audit quietly.
Here are the scenarios that drive real-world DLP deployments:
- A departing employee emails a customer list to their personal Gmail before their last day
- A contractor uploads a contract containing bank account numbers to a public SharePoint site
- A sales rep pastes credit card details into a Teams chat to “quickly share” with a colleague
- A manager shares a OneDrive folder containing patient health information with an external consultant
None of these requires a malicious actor. DLP handles all of them.
Microsoft 365 Workloads Protected by Microsoft Purview DLP
| Location | What DLP Monitors |
|---|---|
| Exchange Online | Emails sent and received, including attachments |
| SharePoint Online | File uploads, document sharing, and external access |
| OneDrive for Business | File storage and external sharing links |
| Microsoft Teams | Chat messages and channel messages |
| Endpoint Devices | Copy, print, USB transfer, browser upload on Windows/macOS |
| Instances (Defender for Cloud Apps) | Third-party cloud app activity |
| On-premises repositories | Files on file servers via the DLP on-premises scanner |
The power of covering all these locations in a single policy is significant: data does not respect workload boundaries. A file that starts in SharePoint can be emailed from Exchange, downloaded to a device, and uploaded to a personal cloud storage service all within minutes. A unified DLP policy follows it across every step.
Microsoft Purview DLP Architecture: Three Layers
Layer 1: Sensitive Information Types (SITs): the detection engine. Microsoft provides over 300 built-in SITs covering global financial, health, and government data formats. This guide uses the built-in Credit Card Number SIT. Part 2 of this series covers building custom SITs for proprietary data formats.
Layer 2: Policy Rules: the logic layer. Rules define the if-then logic: IF content contains [SIT or label] AND [optional conditions], THEN take [action]. A single policy can contain multiple rules at different severity thresholds.
Layer 3: Policy Actions: the enforcement layer. Options range from silent audit logging to real-time user policy tips to hard blocks that prevent the action entirely.
🔄 DLP Policy Evaluation Flow
Step-by-Step Lab: Create a Custom Microsoft Purview DLP Policy
Prerequisites: Microsoft 365 E3 or E5 licence. Compliance Administrator or Global Administrator role. Access to purview.microsoft.com.
Step 1: Open the Microsoft Purview Compliance Portal
Navigate to purview.microsoft.com and sign in with your administrator account. From the home page, click the Solutions icon in the left navigation bar. The full solutions menu expands, listing every Purview capability.
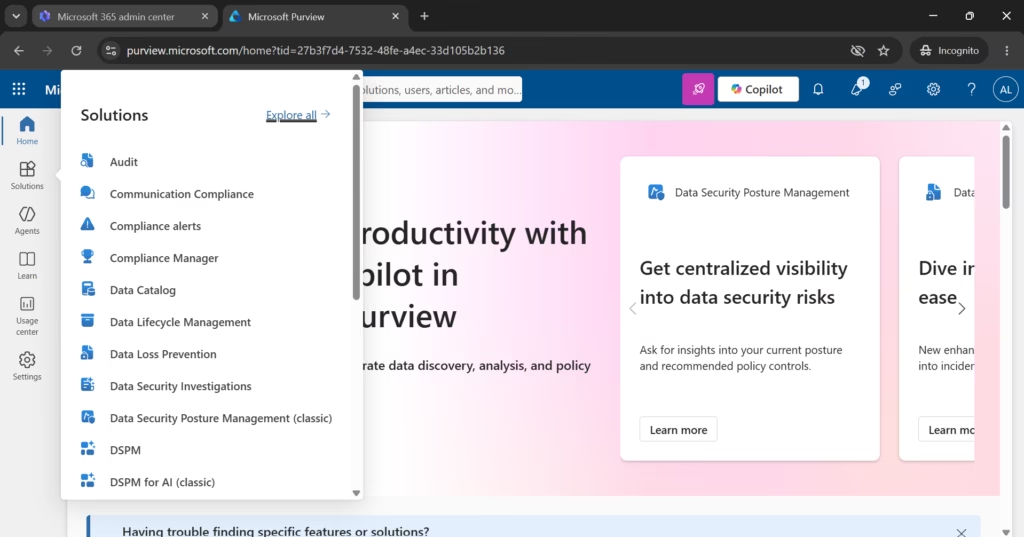
Select Data Loss Prevention from the list.
Step 2: Review the Microsoft Purview DLP Overview
The Overview page is your Microsoft Purview DLP dashboard. It shows active policies, recent alert activity, and data sensitivity trends. More importantly, you can see any default policies Microsoft has already pre-deployed in your tenant.
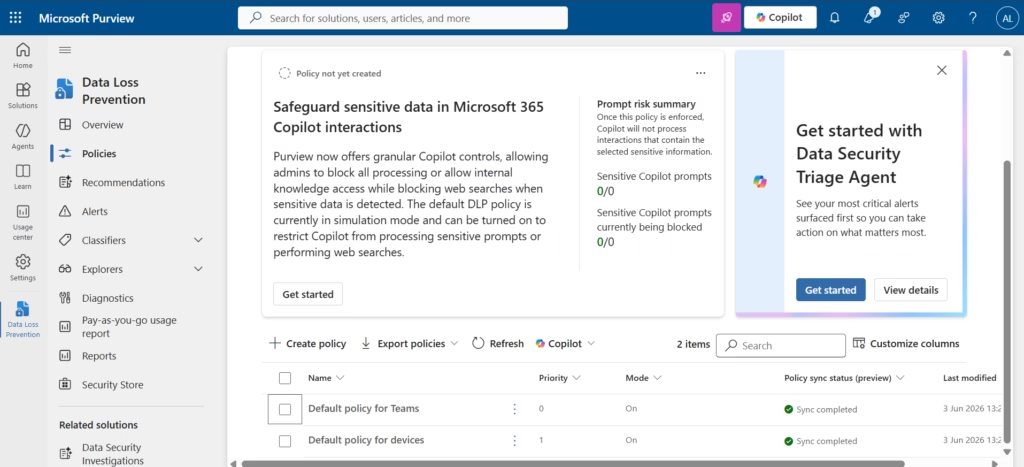
💡 Best Practice: Microsoft automatically deploys two default DLP policies in new tenants one for Teams and one for endpoint devices. Do not delete these. Your custom policies stack on top of them.
Step 3: Start Creating a New Policy
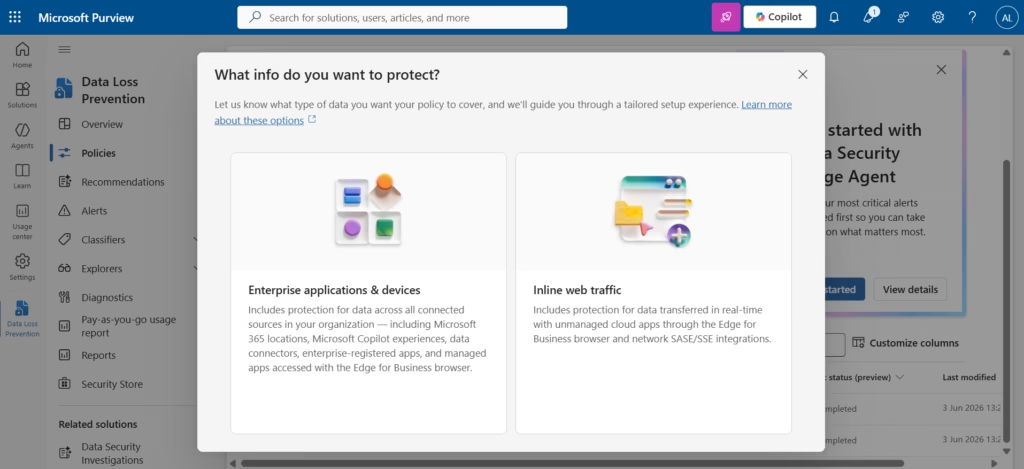
In the left panel, click Policies, then click + Create policy.
A modal window appears: “What info do you want to protect?”
Select Enterprise applications & devices. This path covers all Microsoft 365 workloads Exchange, SharePoint, OneDrive, Teams, and endpoints. The “Inline web traffic” option is for Edge for Business browser traffic via network SSE integrations, which is an advanced scenario outside the scope of this guide.
Step 4: Choose a Policy Template
The Template or custom policy page offers two paths:
- Template-based policies: pre-built rule sets for regulations like GDPR, PCI-DSS, HIPAA, and the Australian Privacy Act. Microsoft maintains these templates as regulations evolve.
- Custom policy: you define every condition and action yourself, with full control over what triggers the rule and how it responds.
For this lab, select Custom under Categories, then select Custom policy in the Regulations panel on the right.
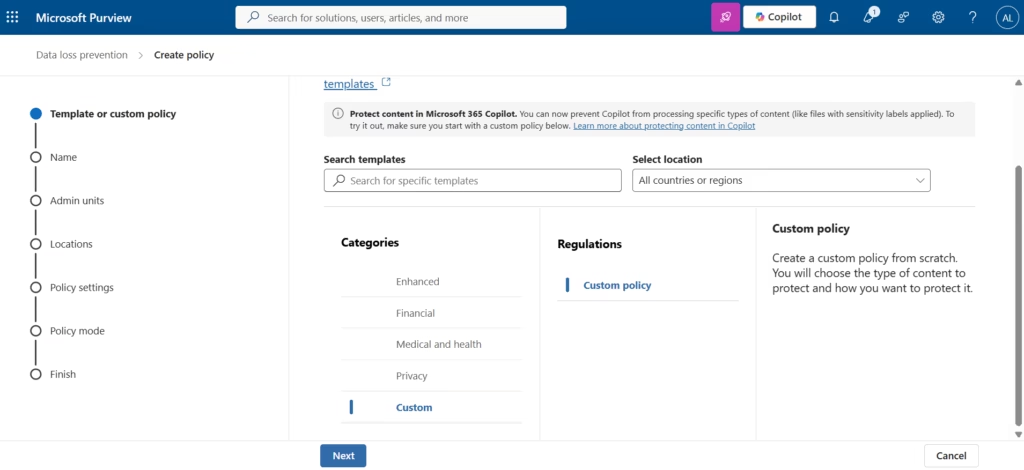
⚠️ Common Mistake: Admins often deploy regulation templates without inspecting the included rules first. Always open a template, review its sensitive info types and thresholds, and adjust for your organisation before publishing.
Click Next.
Step 5: Name Your Policy
Give the policy a name that immediately communicates its purpose, scope, and the data it protects. You will eventually have multiple Microsoft Purview DLP policies clear naming saves hours of troubleshooting.
For this lab, enter: Finance Credit Card Protection
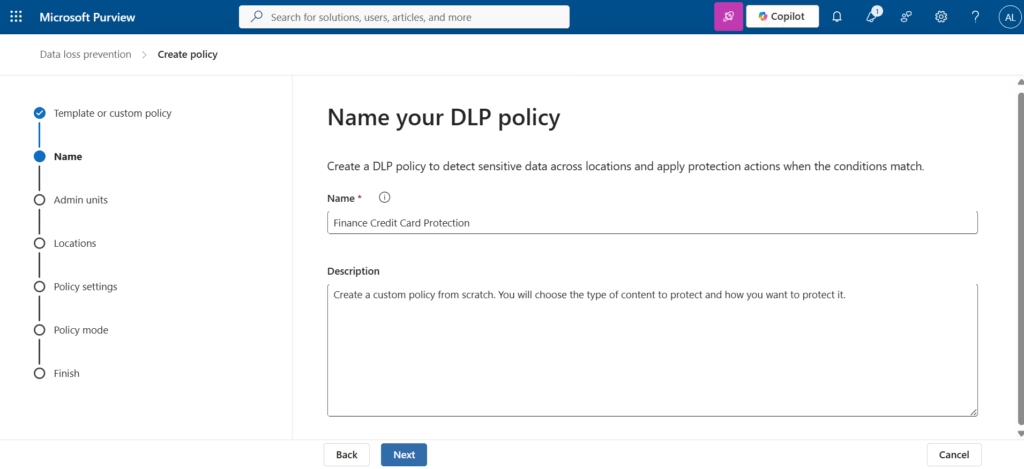
Click Next.
Step 6: Assign Admin Units
Admin units allow you to scope a Microsoft Purview DLP policy to a subset of users managed by a specific administrative unit in Microsoft Entra ID. This is used in large enterprises where different compliance administrators manage different regional divisions.
For this lab and for most organizations starting with Microsoft Purview DLP, leave the default: Full directory. The policy applies to every user in your tenant.
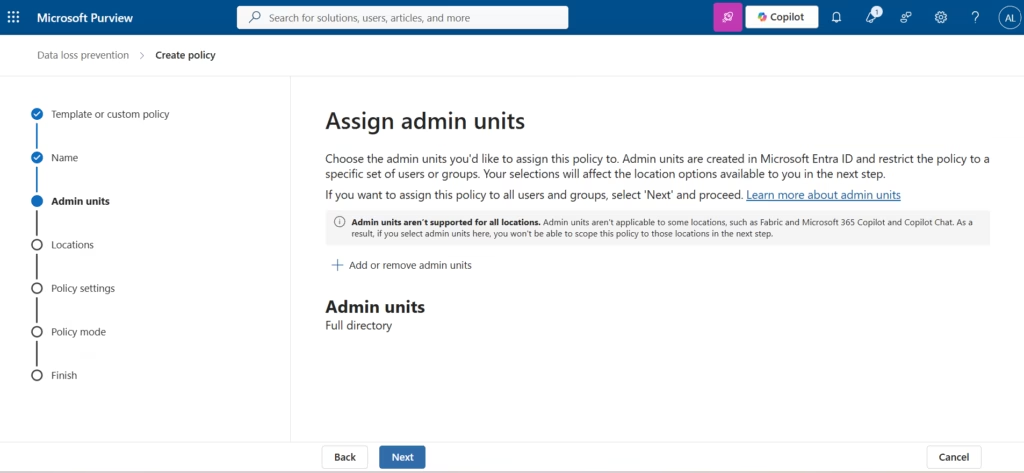
Click Next.
Step 7: Choose Protected Locations
This is where you decide which Microsoft 365 workloads the policy will monitor and enforce. Enabling all locations provides the broadest protection and closes gaps that appear when data moves between services.
Enable: Exchange email, SharePoint sites, OneDrive accounts, Teams chat and channel messages, Devices, Instances, and On-premises repositories.
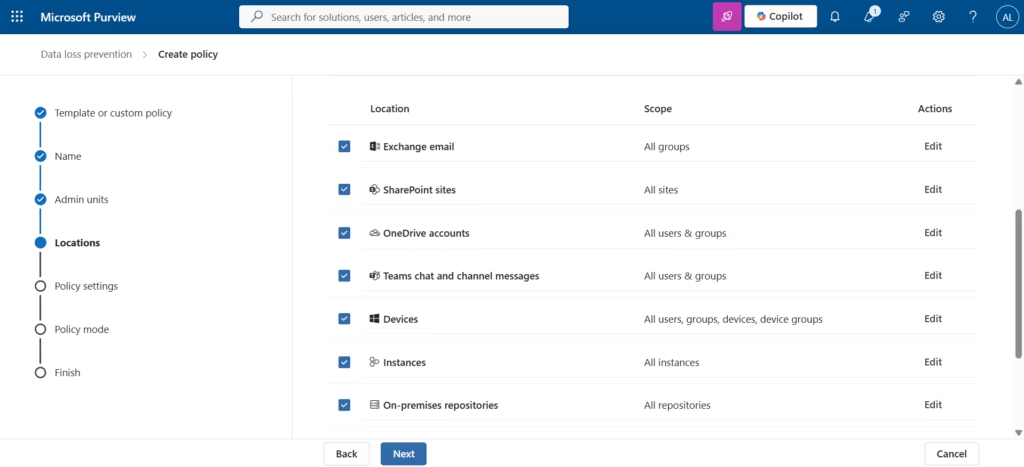
💡 Best Practice: Start with all locations enabled. Use the Edit action next to each location to narrow scope to specific groups, sites, or users once you understand your data flow.
Click Next.
Step 8: Select Advanced Microsoft Purview DLP Rules
The Define policy settings page asks how you want to build the policy’s logic. Select Create or customize advanced Microsoft Purview DLP rules. This gives you full control to define conditions, actions, and notifications independently for each rule.
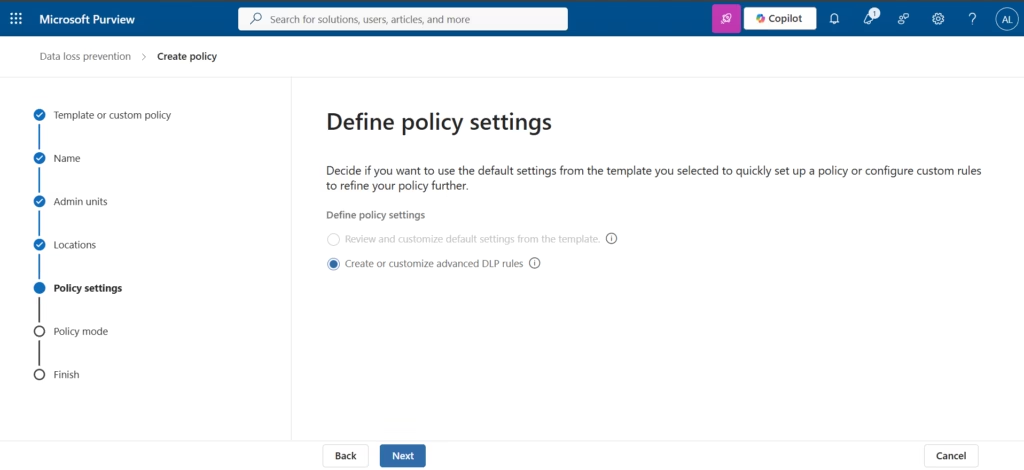
Click Next.
Step 9: Open the Rule Builder
The Customize advanced Microsoft Purview DLP rules page starts empty. This is expected your policy has no rules yet.
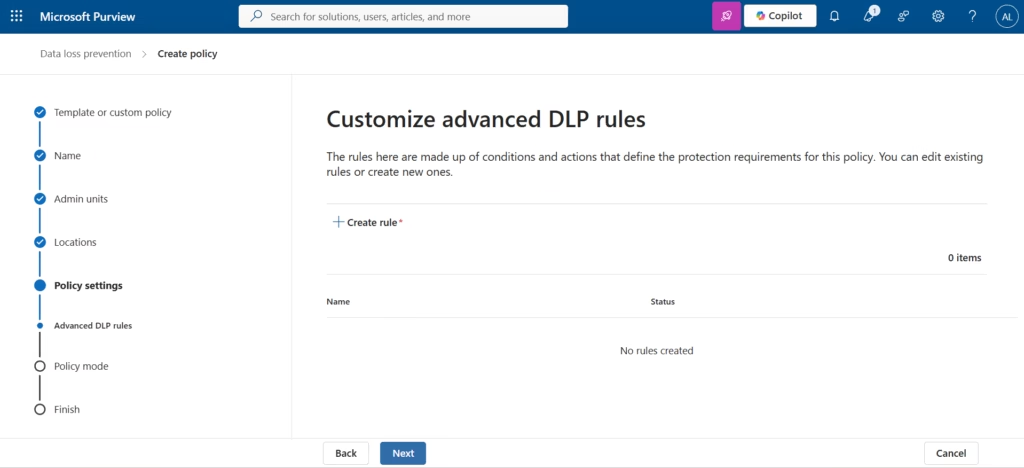
Click + Create rule. The rule creation panel slides open on the right.
Give the rule a descriptive name, for example: Block External Sharing of Credit Card Data
Step 10: Set the Rule Condition
Under Conditions, the Content contains group is already present. Click Add → Sensitive info types.
Search for the credit card number and select it. Click Add to apply it to the condition.
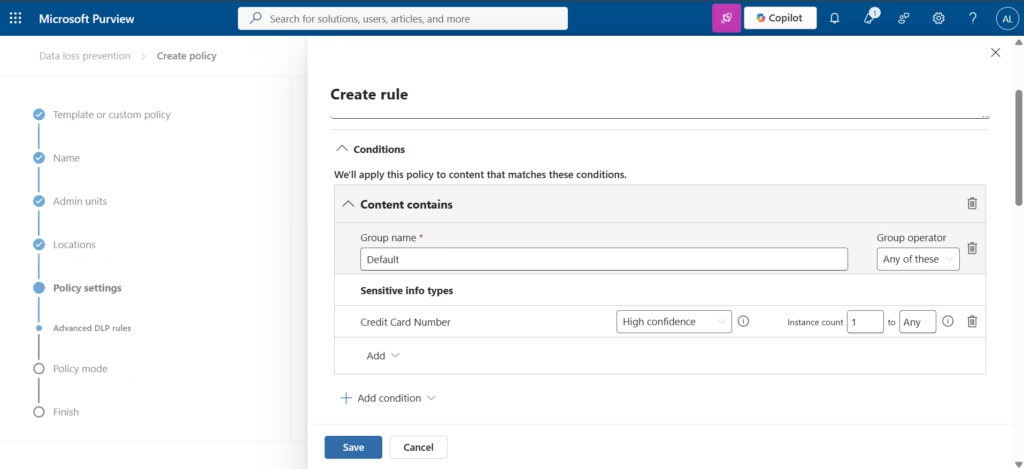
Two settings matter here:
- Confidence level: High confidence recommended for production. High confidence means the SIT pattern must be accompanied by supporting evidence (like a keyword such as “Visa” or “card number” nearby), which drastically reduces false positives.
- Instance count: 1 to Any the rule fires on any single detection. For a busy finance environment, consider raising this threshold to 5 or 10 after reviewing simulation results.
⚠️ Common Mistake: Using Low confidence in production. Low confidence triggers on pattern matches alone, without supporting context, generating large volumes of false positives. Users start ignoring Microsoft Purview DLP notifications making the policy effectively useless.
Step 11: Add a Rule Action
Under Actions, click + Add an action to see all available enforcement options.
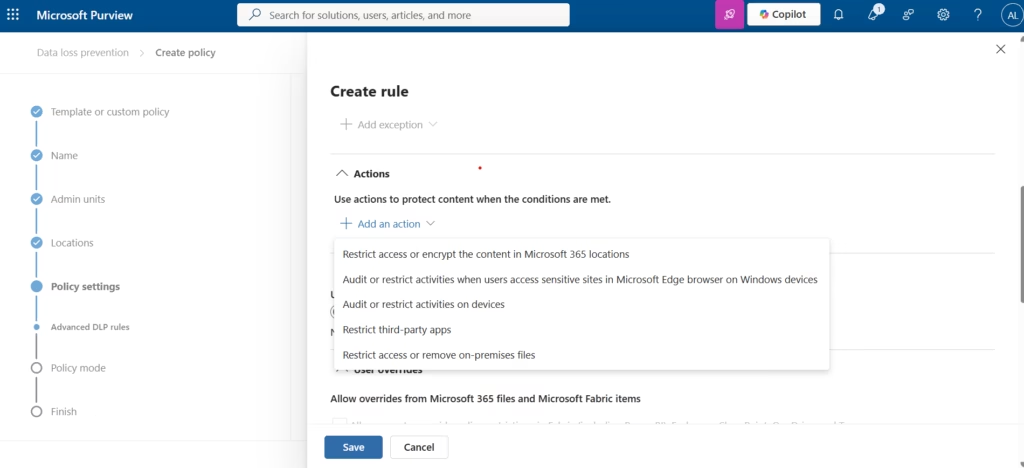
Select Restrict access or encrypt the content in Microsoft 365 locations.
In the expanded action settings, choose Block only people outside your organization.
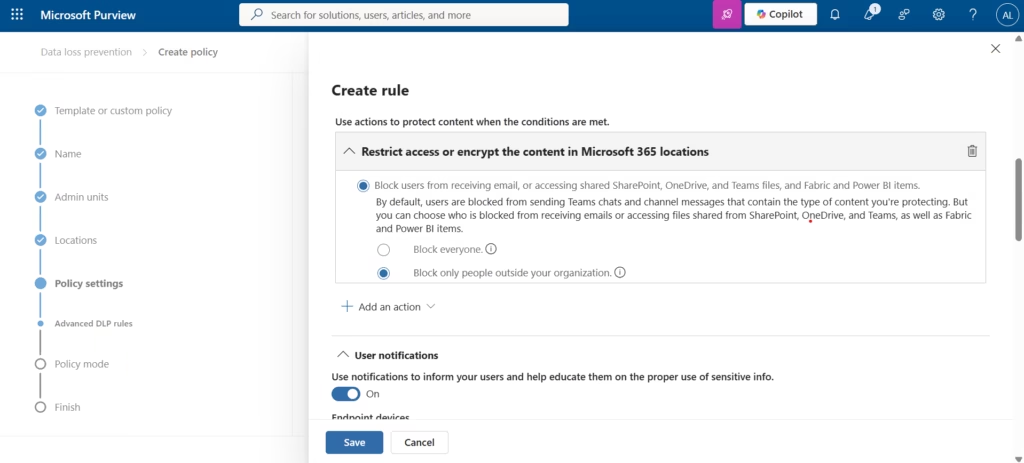
This is a balanced enforcement setting: external users cannot access the content, but internal users retain full access. It is the right starting point for most organisations before tightening to a full block.
Step 12: Configure User Notifications
User notifications display a policy tip directly to the user at the moment they try to share or send content that triggers the rule. This is the most effective long-term DLP tool it educates users in real time, changing behaviour without requiring administrator intervention.
Under User notifications, toggle the switch to On.
Enable both:
- Show users a policy tip notification (for endpoint device activity)
- Notify users in Office 365 service with a policy tip or email notifications (for M365 workloads)
Leave Notify the user who sent, shared, or last modified the content selected.
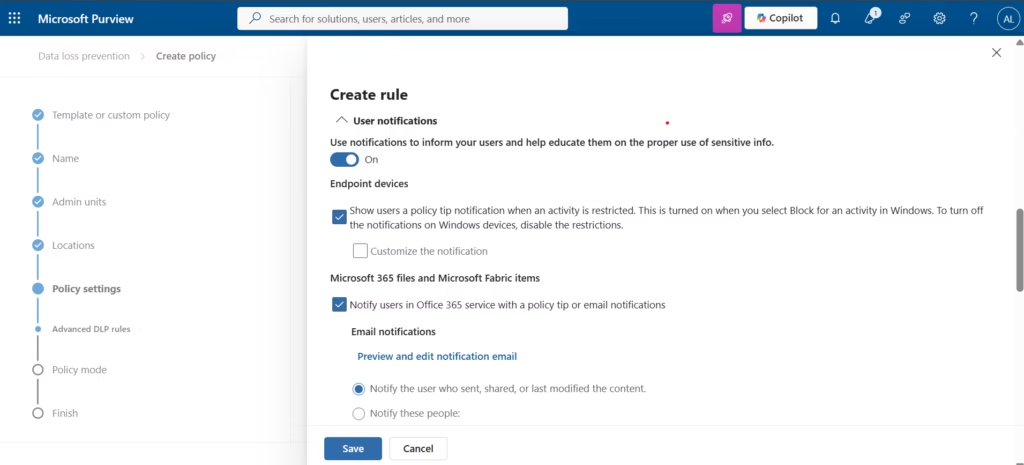
Click Save to save the rule. It now appears in the Advanced DLP rules list.
Click Next.
Step 13: Set Policy Mode Start in Simulation
On the Policy mode page, you have three options:
| Mode | What It Does |
|---|---|
| Simulation mode | Evaluates content, logs matches, takes NO action. Users see no notifications. |
| Turn it on right away | Immediately enforces all actions and notifications. |
| Keep it off | Saves the policy without activating it. |
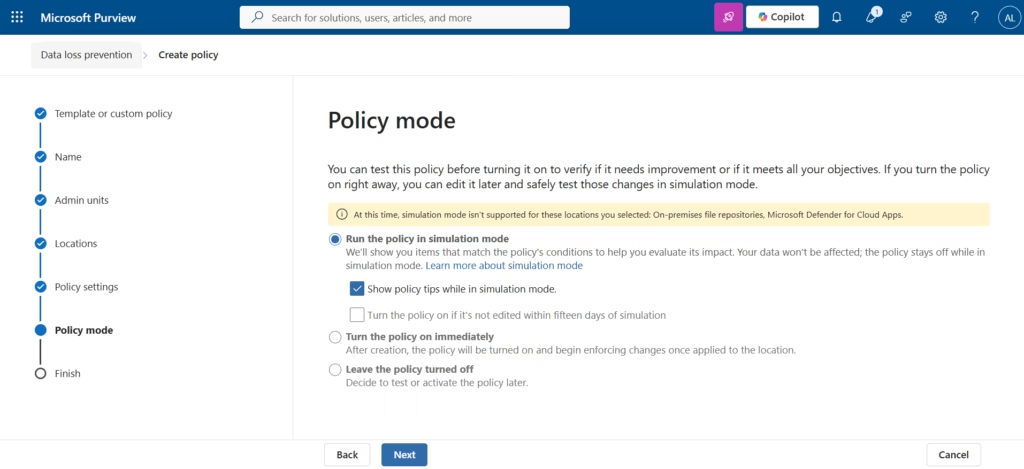
Select Run the policy in simulation mode.
💡 Best Practice: Always run a new DLP policy in simulation for at least 48 hours before enabling enforcement. Review the results in Activity Explorer (covered in Part 2) to identify false positives before they affect real users.
⚠️ Common Mistake: Skipping simulation and going straight to enforcement on a broad policy. A single misconfigured rule can block hundreds of legitimate emails. Simulation mode is your safety net.
Click Next.
Step 14: Review and Create the Policy
The Finish page shows a complete summary of your policy configuration template, name, locations, rules, and mode. Review each section carefully.
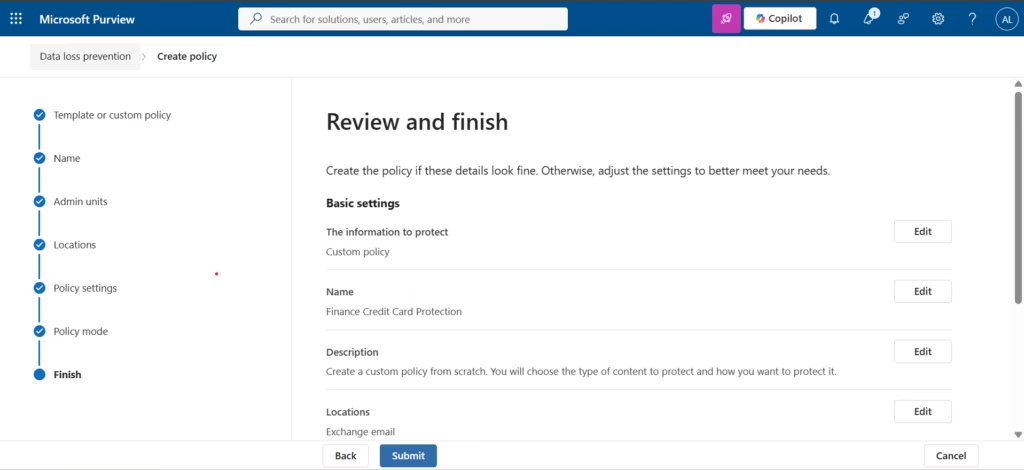
When satisfied, click Create.
Microsoft Purview submits the policy and begins distributing it to all configured locations across your Microsoft 365 tenant.
Step 15: Policy Sync: Confirming Successful Deployment
After creation, navigate back to Policies in the left panel. Locate Finance Credit Card Protection in the list.
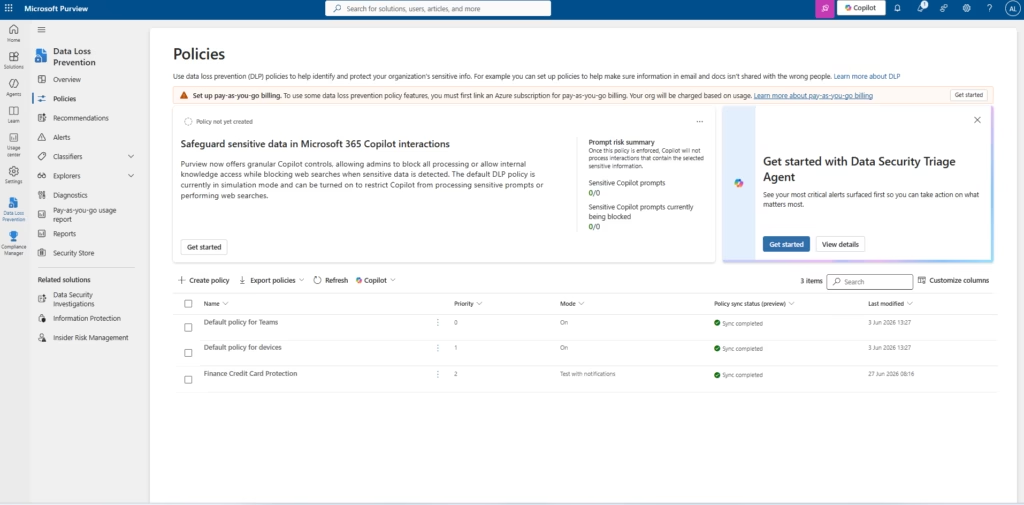
In the Policy sync status column, you will initially see a pending or in-progress indicator. Refresh the page after a few minutes. When it shows Sync completed, the policy is active and running in simulation mode across every selected location.
💡 Note: Policy sync can take up to 24 hours for all locations to receive the configuration fully, particularly for endpoint DLP on managed Windows devices. Exchange and SharePoint typically sync within minutes.
Your first Microsoft Purview DLP policy is now deployed and evaluating content across your entire Microsoft 365 tenant without taking any action yet.
Best Practices
“The following practices apply whether you’re deploying your first DLP policy or your fiftieth. They reflect patterns learned from real tenant deployments, not just theory.”
- Simulate before enforcing. Run every new policy in simulation for 48+ hours and review matches before switching to enforcement mode.
- Use High confidence for production SITs. This alone eliminates the majority of false positive complaints from users.
- Name policies and rules to be self-explanatory. “Finance Credit Card Protection Block External” tells you everything. “DLP Policy 3” tells you nothing.
- Enable user notifications from day one. Policy tips change user behaviour far more effectively than silent blocks.
- Layer policies by data type. Create separate focused policies for credit card data, health records, and custom data, rather than one policy trying to cover everything.
- Never delete Microsoft’s default policies. They handle Teams and endpoint scenarios with pre-tested rules.
MS-102 Exam Tips
Scenario you’ll likely see: “An organisation needs to prevent employees from emailing files containing credit card numbers to external recipients. The administrator must also ensure users are informed when this occurs. Which feature should the administrator configure?”
Correct answer: A Microsoft Purview DLP policy with a Credit Card Number SIT condition, a block-external action, and user notifications enabled Not: Sensitivity labels (these classify and protect documents; they don’t block sharing based on content patterns at send time) | Retention policies (retention manages data lifecycle, not sharing behaviour)
Remember: DLP = detect and enforce based on content in motion. Sensitivity labels = classify and protect individual files. Retention policies = keep or delete content based on time rules.
Also know for the exam:
- Microsoft 365 E3 licences cover DLP for Exchange, SharePoint, OneDrive, and Teams
- Endpoint DLP (device activity monitoring) requires Microsoft 365 E5 or the E5 Compliance add-on
- Simulation mode evaluates policy logic without taking any action always the correct first step for a new policy
- Policy sync can take up to 24 hours; Exchange and SharePoint sync faster than endpoint devices
FAQ
Q: What is the difference between DLP and sensitivity labels?
A: Sensitivity labels classify and protect individual files or emails the label travels with the document. DLP policies monitor content across your M365 environment and enforce rules at the point of action (sending, sharing, uploading). They complement each other: a DLP rule can use a sensitivity label as its trigger condition.
Q: What happens if a user gets a policy tip but sends the email anyway?
A: By default, users can override a policy tip with a business justification. You can disable overrides in the rule’s User overrides section to make the block absolute. Whether to allow override is a policy design decision, not a technical limitation.
Q: What Microsoft 365 licences are required for DLP?
A: Microsoft 365 E3 covers cloud workload DLP (Exchange, SharePoint, OneDrive, Teams). Endpoint DLP requires Microsoft 365 E5 or the standalone Microsoft 365 E5 Compliance licence.
Q: How long does it take for a new DLP policy to start working?
A: Exchange and SharePoint typically sync within minutes to a few hours. Endpoint DLP on managed Windows devices can take up to 24 hours to receive the policy update. The Policy sync status column in the Policies list confirms when sync is complete.
Q: Can I edit a DLP policy after it has been published?
A: Yes. Navigate to the policy in the Policies list, click the policy name, then click Edit policy. Changes take effect after the next sync cycle. For significant changes, consider switching back to Simulation mode temporarily while the update propagates.
Conclusion
You have created and deployed your first Microsoft Purview DLP policy one that detects credit card numbers across every Microsoft 365 workload and blocks external sharing in simulation mode. The policy is now scanning your tenant’s content and building a picture of where sensitive data flows, ready for you to review before switching to full enforcement.
In Part 2 of this series, you will learn how to build a custom Sensitive Information Type to detect your organisation’s proprietary data formats content that Microsoft’s built-in SITs cannot recognise. Then you’ll use Activity Explorer to read the simulation results from this policy and refine it before going live.
Related Posts in the MS-102 Series
- Part 2: Custom Sensitive Info Types in Microsoft Purview DLP MS-102 Lab (2026)
- Part 3: Monitor and Alert on DLP Policy Matches MS-102 Guide (2026)
- Previous: eDiscovery in Microsoft Purview: Proven MS-102 Lab Guide (2026)
- Related: Microsoft Purview Sensitivity Labels MS-102 Lab Guide
- Related: Microsoft Purview Audit Logs MS-102 Lab Guide
Official Microsoft Reference: Learn about data loss prevention, Microsoft Learn
4 thoughts on “Microsoft Purview DLP: Proven MS-102 Lab Guide (2026)”