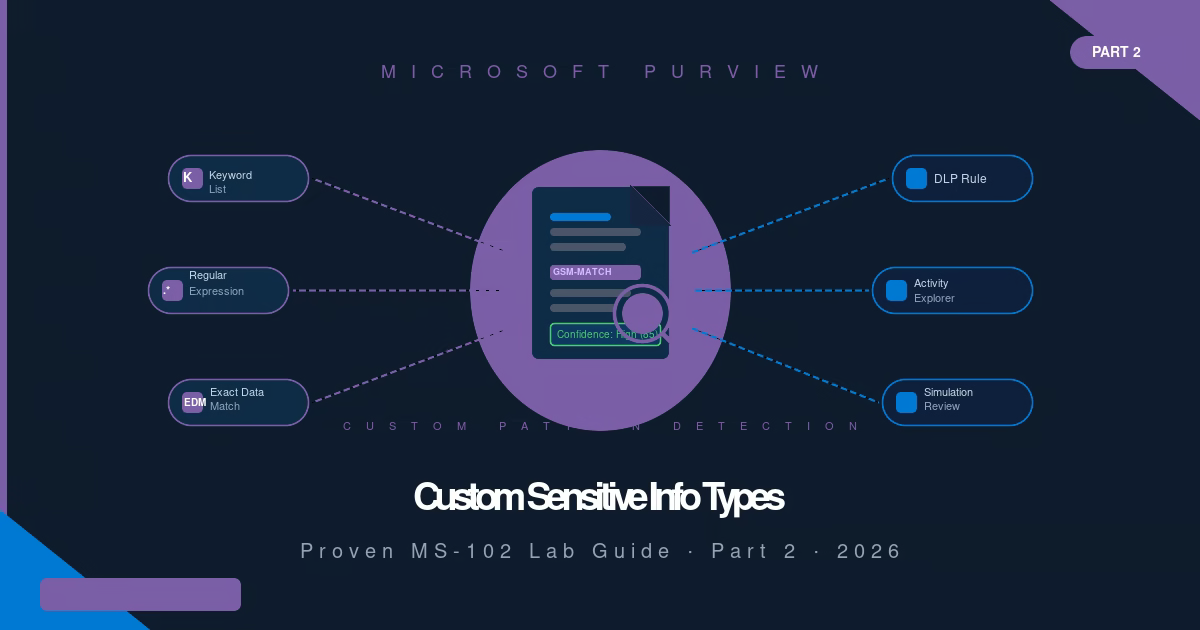
Microsoft provides 327 built-in Sensitive Information Types, but none of them know what a GSM number, internal project code, or your organization’s proprietary data format looks like. That’s where custom Sensitive Information Types come in.
This lab originally covered custom SIT creation and cloud-workload detection through Activity Explorer. It now also covers Endpoint DLP, extending the GSM custom SIT to Windows endpoints so that the same sensitive data is detected and blocked when a user tries to copy it to a removable USB device, print it, or upload it to an unauthorized website, including Generative AI tools such as ChatGPT, Gemini, and Claude.
In this guide, Part 2 of a 3-part Microsoft Purview DLP series, you’ll learn:
- When built-in Sensitive Information Types aren’t enough
- How to create Custom Sensitive Information Types using a keyword list
- How to add it as a condition in a DLP rule
- How to use Activity Explorer to review your simulation results
- MS-102 exam tips for Custom Sensitive Information Types and monitoring
Series navigation: Part 1: Create your first DLP policy ← Start here if you haven’t Part 2: You are here: Custom SITs and Activity Explorer Part 3: DLP Alerts, Reports, and switching to Enforce mode (coming soon)
Quick Definition: A Custom Sensitive Information Type (SIT) is a user-defined pattern in Microsoft Purview, built from keyword lists, regex, or Exact Data Match, that detects organization-specific data your 327 built-in SITs don’t recognize.
Why Built-In SITs Are Not Always Enough
In Part 1, you used the built-in Credit Card Number Sensitive Information Type to detect payment card data. Microsoft’s library of 327 built-in SITs covers most global financial, health, and government data formats, including credit cards, Social Security Numbers, passport numbers, IBAN codes, Australian Tax File Numbers, and more.
But organizations generate proprietary data that Microsoft cannot predict. Consider:
- An internal employee ID format like
EMP-2026-XXXXX - A project code series like
PRJ-AZURE-001 - A telecom operator tracking subscribers by GSM network identifier
- A healthcare provider using internal patient reference numbers outside the ICD standard
- A financial firm with a proprietary account numbering scheme
None of these appear in Microsoft’s built-in SIT library. If you deploy a DLP policy without covering them, that data flows freely, undetected and unprotected.
Custom Sensitive Information Types solve this. They use the same detection engine as built-in SITs, but you define the pattern. Once created, a Custom Sensitive Information Types behaves identically to a built-in one inside any DLP policy.
Three Ways to Detect Custom Data
Microsoft Purview gives you three pattern types for Custom Sensitive Information Types:
| Pattern Type | Best For | Example |
|---|---|---|
| Keyword list | Fixed terms, codes, and acronyms | “GSM”, “CONFIDENTIAL”, “PROJ-2026” |
| Regular expression (regex) | Structured formats with variable digits | Employee IDs: EMP-\d{4}-\d{5} |
| Exact Data Match (EDM) | Large, specific datasets like HR records | Match against an uploaded CSV of employee IDs |
This lab uses a keyword list as the simplest and most common starting point. Part 3 will cover regex patterns for structured data formats.
Step-by-Step Lab: Create a Custom Sensitive Information Type
Prerequisites: Compliance Administrator or Global Administrator role. Access to purview.microsoft.com.
- Navigate to Sensitive Information Types
- Name Your Custom Sensitive Information Type
- Define Detection Patterns
- Set the Recommended Confidence Level
- Review and Create
Step 1: Navigate to Sensitive Information Types
From the Microsoft Purview compliance portal, go to the left navigation and select Data Loss Prevention → Classifiers → Sensitive info types.
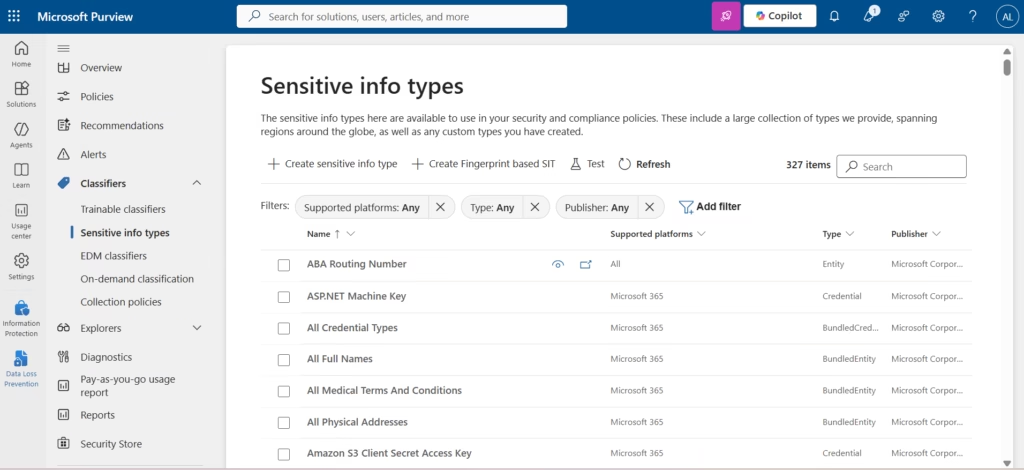
The list shows 327 items, Microsoft-published SITs, sorted alphabetically. Your Custom Sensitive Information Types will appear here once created, labeled with your tenant name as the publisher.
Click + Create sensitive info type.
Step 2: Name Your Custom Sensitive Information Types
The name and description you enter here will appear in policy conditions and audit logs. Use a name that makes the data type immediately recognizable to any admin who reads it later.
For this lab, enter:
- Name: GSM
- Description: Detects GSM mobile network identifier terms in content
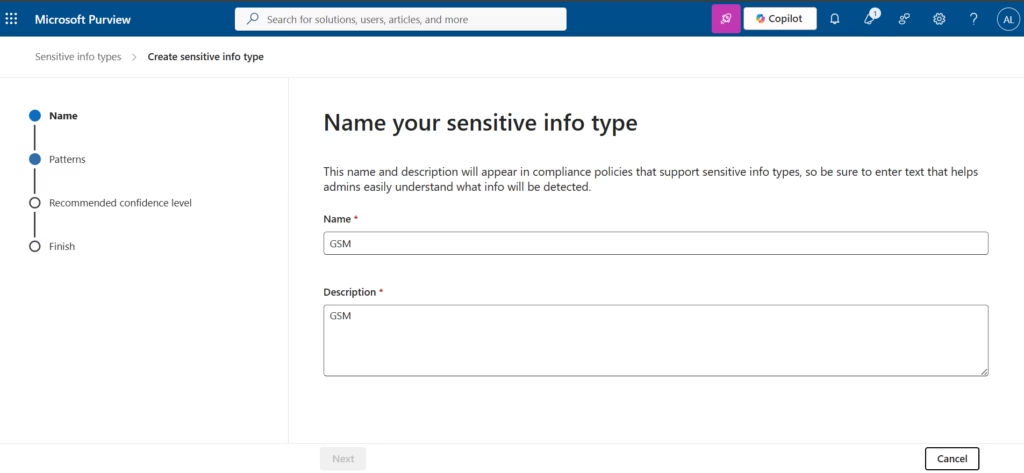
💡 Best Practice: In production, use descriptive names like “Internal Project Code,” “Employee Reference Number,” or “Subscriber GSM ID” rather than abbreviations alone. When you have 20 Custom Sensitive Information Types, clarity saves hours of troubleshooting.
Click Next.
Step 3: Define Detection Patterns
This is the core of your custom SIT. Every SIT is made up of one or more patterns. Each pattern defines:
- A confidence level (High, Medium, or Low)
- A primary element the main data to detect (keyword, regex, or EDM lookup)
- Optional supporting elements, additional evidence that boosts confidence
Click + Create pattern. The New pattern panel slides open.
Configure the pattern:
- Confidence level: High confidence
- Primary element: Click + Add primary element → select Keyword list
- In the keyword list panel, enter:
GSM - Character proximity: Check anywhere in the document (this means the keyword can appear anywhere, not just near supporting evidence)
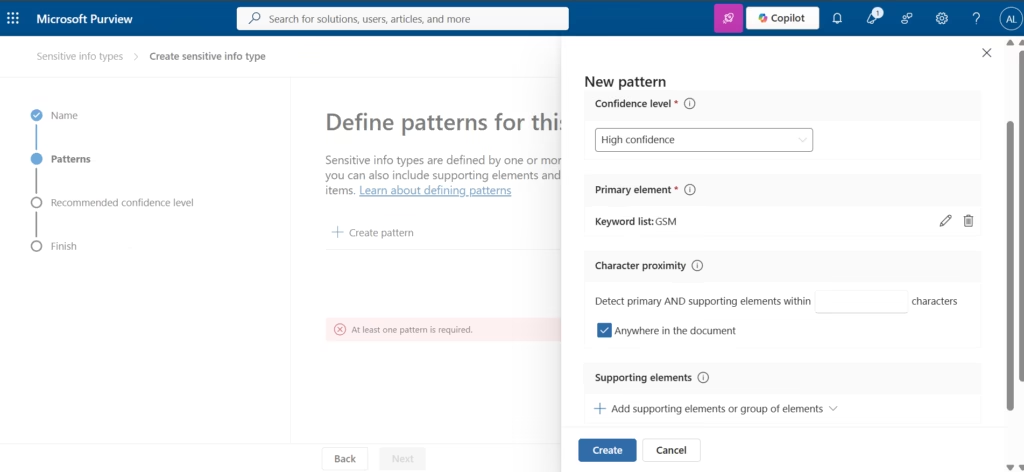
Click Create to save the pattern.
⚠️ Common Mistake: Single-word keyword SITs without supporting elements generate significant false positives in large organisations. “GSM” could appear in a legitimate article about telecommunications. In production, add supporting elements nearby keywords like “subscriber,” “network,” “IMSI,” or “SIM” to require corroborating context before the SIT fires.
💡 Best Practice: For production keyword SITs, always add at least one supporting keyword group with a character proximity of 300 characters. This reduces false positives by requiring the keyword to appear in context, not in isolation.
Click Next.
Step 4: Set the Recommended Confidence Level
This page sets the default confidence level that appears when admins add your Custom Sensitive Information Types to a DLP rule condition. Choose High confidence to minimize false positives by default.
Click Next.
Step 5: Review and Create
The Review settings and finish page show a complete summary of your Custom Sensitive Information Types:
- Name: GSM
- Description: GSM
- Patterns: Pattern #1 High confidence
- Recommended confidence level: High confidence
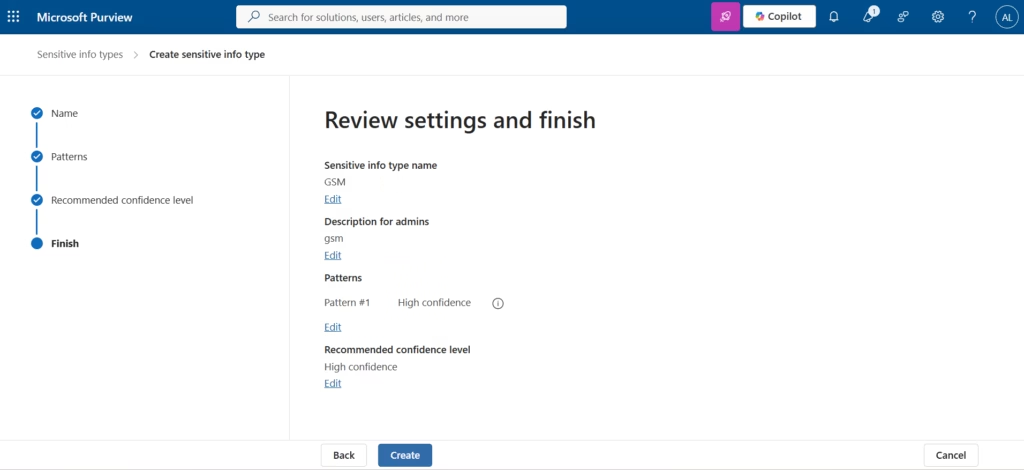
Verify everything is correct, then click Create.
Microsoft Purview processes the new SIT. It takes a few minutes to become available for selection in policy conditions. Once ready, it appears in the Sensitive info types list alongside Microsoft’s 327 built-in SITs, with your tenant name listed as Publisher.
Add the Custom Sensitive Information Types to a DLP Rule
Now that your Custom Sensitive Information Types exist, you can use them in any DLP policy, either by adding them to an existing policy or creating a new one. The steps are identical to adding a built-in SIT.
Navigate to Data Loss Prevention → Policies → open your Finance Credit Card Protection policy from Part 1 → Edit policy → go to Advanced DLP rules → edit the existing rule → Conditions → Content contains → Add → Sensitive info types → search for GSM → select it → Add. <!–
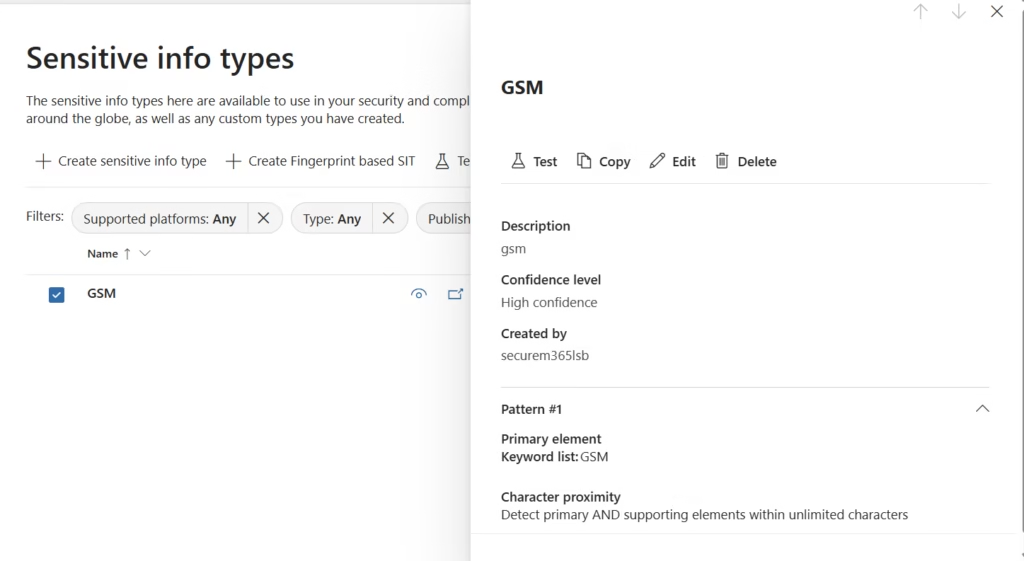
Your rule now detects both Credit Card Numbers (built-in SIT) and GSM (Custom Sensitive Information Types) in the same condition group. Any content matching either of the triggers the rule.
💡 Best Practice: When combining multiple SITs in one condition group, check the Group operator setting. “Any of these” means the rule fires if ANY SIT matches. “All of these” requires ALL SITs to be present in the same content. For most policies, “Any of these” is correct.
Using Activity Explorer to Review Simulation Results
In Part 1, you deployed the Finance Credit Card Protection policy in Simulation mode. After 48+ hours, Activity Explorer shows you every match the policy detected without having taken any action on users.
This data is critical before switching to enforcement mode. It tells you:
- Whether the policy is detecting real sensitive data or generating false positives
- Which workloads are generating the most matches
- Which users or groups are most frequently involved
How to Access Activity Explorer
Navigate to Data Loss Prevention → Activity Explorer in the left panel.
Activity Explorer shows a timeline of DLP-related events across your tenant. Use the filters at the top to narrow the view:
| Filter | What to Set |
|---|---|
| Date range | Last 7 days or last 30 days |
| Activity | “DLP rule matched” |
| Policy | Finance Credit Card Protection |
| Workload | All (or narrow to Exchange/SharePoint) |
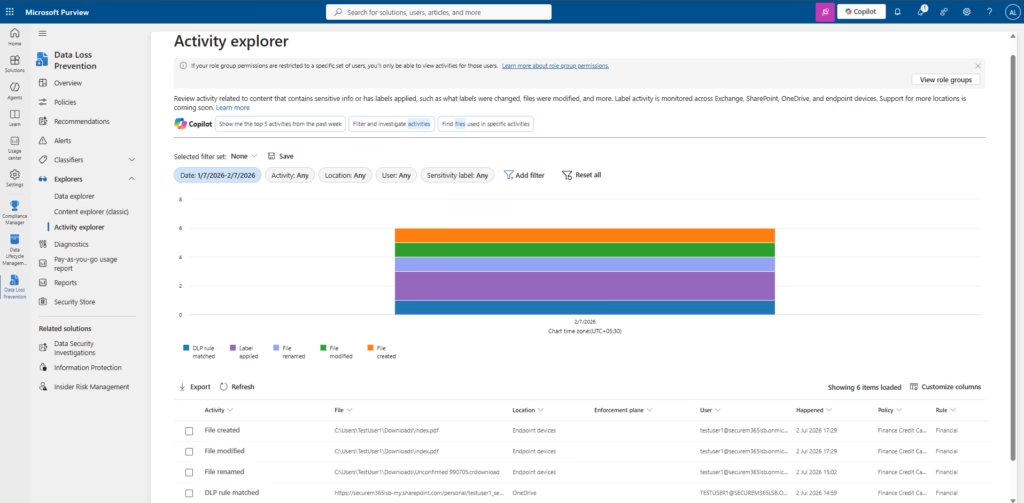
What to Look For in Simulation Results
High match volumes on known-sensitive locations: expected and healthy. If SharePoint sites used by your finance team generate matches, the policy is working correctly.
High match volumes on unexpected locations: investigate. If the rule is matching content in HR SharePoint sites or general Teams channels, you may need to add exceptions or raise the instance count threshold.
Single-instance matches from many different users are likely false positives. The Credit Card Number SIT can occasionally match patterns like phone numbers or employee IDs that happen to follow the Luhn algorithm. Consider raising the instance count to 3–5.
Zero matches after 48 hours: the policy is either not synced yet or the SIT threshold is too high for your environment. Check the policy sync status first.
💡 Best Practice: Run simulation for at least 7 days before switching to enforce mode. One week captures a full business cycle end-of-month finance reports, weekly team updates, and any scheduled data exports that only happen at specific times.
⚠️ Common Mistake: Switching to enforcement mode after 48 hours and immediately generating a wave of user complaints about blocked emails. Simulation data from a full week reveals patterns that two days cannot.
Refining the Policy Before Enforcement
Based on your Activity Explorer data, make targeted adjustments:
Too many false positives on Exchange: Raise the Credit Card Number instance count from 1 to 5. A single accidental pattern match is unlikely to be a real credit card number; five matches in one email strongly suggest real data.
Finance team getting blocked from legitimate operations: Add a User override to the rule this lets users bypass the block with a written business justification, which gets logged for audit review.
Matches from a specific internal system: Add an Exception condition to the rule: exclude content that also contains [internal system identifier keyword]. This prevents the rule from flagging automated reports from known-safe systems.
Custom Sensitive Information Types generating too many matches: Add supporting elements to the GSM SIT pattern. Navigate back to Classifiers → Sensitive info types → GSM → Edit → open Pattern #1 → Add supporting elements → keyword group → add context keywords → save.
Once you’re confident the simulation data reflects accurate detections with manageable false positives, you’re ready to extend coverage to endpoints, the topic of the next section. You’re ready for Part 3.
Extending Protection to Endpoints: Endpoint DLP
Everything covered so far protects the GSM custom SIT inside Exchange Online, SharePoint Online, OneDrive, and Teams — the cloud workloads. It does not protect the same data on a user’s Windows device once that document has been downloaded locally.
A user can download a file containing GSM data from OneDrive, then copy the text to a USB drive, paste it into a personal webmail account, print it, or upload it to a public website — all of these are local, endpoint-level activities that cloud-workload DLP does not see. Endpoint DLP closes this gap by extending the same custom SIT to the device itself.
Why Endpoint DLP Is Required
Cloud DLP inspects content in transit through Microsoft 365 services. It cannot see what happens after a file lands on a laptop. In practice, this creates a blind spot for three scenarios that are common in real organizations:
- Removable media — copying a sensitive file to a USB drive bypasses cloud inspection entirely.
- Local printing — a printed document containing GSM subscriber data leaves no cloud audit trail.
- Browser uploads to unmanaged destinations — a user pastes sensitive content into a chatbot, personal cloud storage, or any website Microsoft doesn’t control.
The last scenario has become the most urgent in 2026. Generative AI tools accept pasted or uploaded content as training or context data, and once sensitive information leaves your tenant boundary through a browser upload, there is no way to retrieve or redact it. Endpoint DLP is the only Purview capability that inspects file and clipboard activity on the device, before data reaches an external destination.
Certification alignment: Endpoint DLP is a Core Exam Objective for MS-102 under the Information Protection and Data Loss Prevention domain. Understand the distinction between DLP for cloud workloads (Exchange, SharePoint, OneDrive, Teams) and DLP for endpoint devices — they use separate onboarding processes but share the same policies, conditions, and Sensitive Information Types.
Endpoint DLP Architecture
Endpoint DLP is not a separate product — it is a delivery mechanism for the same DLP policies you already built, extended to Windows and macOS devices through Microsoft Defender for Endpoint.
The data flow works as follows:
- Microsoft Defender for Endpoint onboards the device and installs the sensor that reports device telemetry to the Microsoft 365 Defender/Purview backend.
- Microsoft Purview Endpoint DLP is enabled at the tenant level, which registers Purview as a consumer of Defender for Endpoint’s device inventory.
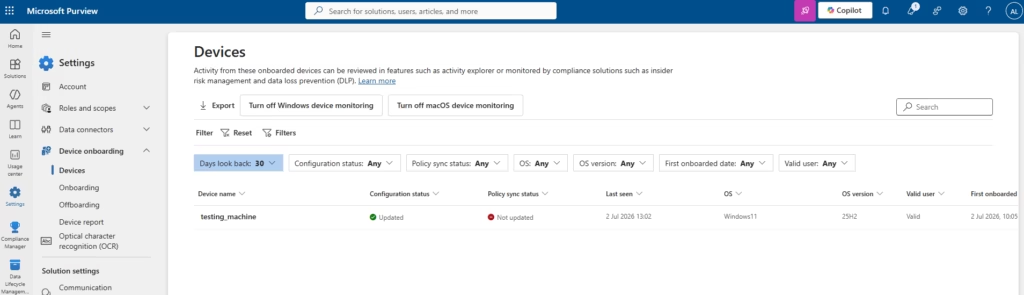
- Onboarded devices synchronize automatically into Purview → Settings → Device onboarding → Devices. Synchronization is not instant — newly onboarded devices can take several minutes to several hours to appear, depending on Defender for Endpoint’s own sync cadence.
- Once a device shows a Configuration status of “Updated” and a Policy sync status of “Updated,” it is actively enforcing DLP policies locally.
- The Purview DLP policy engine evaluates file, clipboard, print, and browser activity against your existing rule conditions (including the GSM custom SIT) directly on the endpoint.
- Matches generate the same telemetry you already use for cloud workloads — visible in Activity Explorer, and where configured, trigger alerts.
Because Endpoint DLP reuses your existing policies and Sensitive Information Types, you do not need to recreate the GSM SIT or rebuild the Finance Credit Card Protection policy. You extend the existing rule to a new location — Devices — and add device-specific actions.
Prerequisites for Endpoint DLP
Before configuring Endpoint DLP, confirm the following:
- Microsoft Defender for Endpoint onboarding must be enabled, and the target Windows device must show a healthy sensor status in the Defender portal.
- Microsoft Purview Endpoint DLP must be enabled from Purview → Settings → Device onboarding.
- The signed-in administrator needs Compliance Administrator or Global Administrator permissions to configure Endpoint DLP settings and edit DLP policies.
- Licensing that includes Microsoft Purview Data Loss Prevention for endpoints (bundled with Microsoft 365 E5 / E5 Compliance, or available as a standalone add-on) must be assigned to the test user.
- Allow time after onboarding for device synchronization — do not assume a device is unprotected just because it hasn’t appeared yet.
Device Onboarding Workflow
- In the Purview compliance portal, go to Settings → Device onboarding → Onboarding, and confirm device monitoring is turned on for Windows (and macOS, if applicable).
- Onboard the target machine into Microsoft Defender for Endpoint using your organization’s standard onboarding package (script, Intune profile, or Group Policy, depending on your environment).
- Go to Settings → Device onboarding → Devices to confirm the device appears. Before onboarding, this page shows “No devices onboarded yet.”
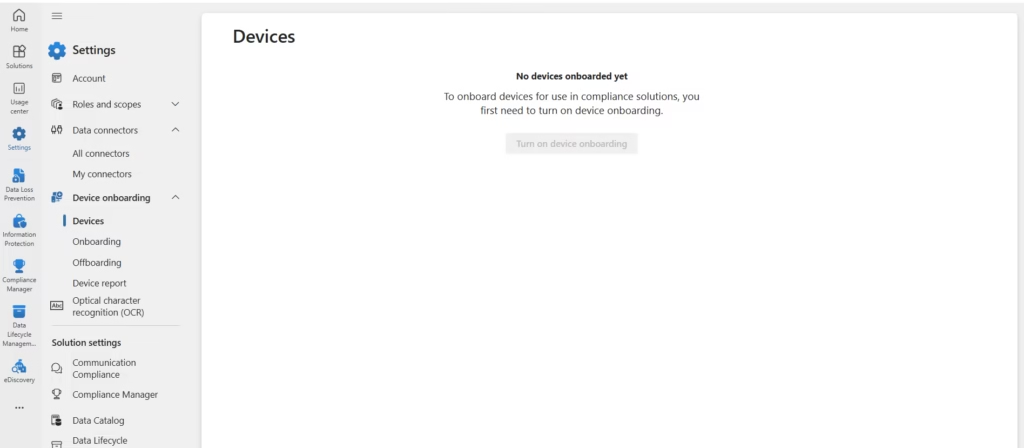
- After onboarding, the device appears in the list, but Policy sync status may initially show “Not updated” while Purview finishes syncing policy configuration to the endpoint.
- Wait and refresh. Once policy sync completes, both Configuration status and Policy sync status show “Updated,” confirming the device is actively enforcing DLP policies.
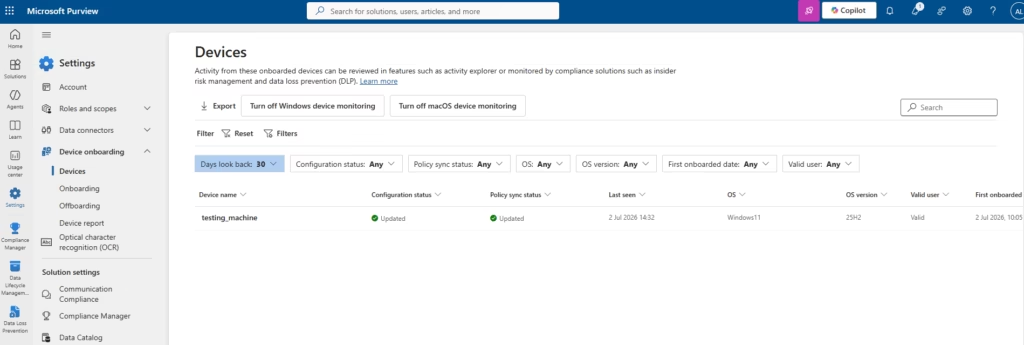
⚠️ Common Mistake: Testing Endpoint DLP immediately after onboarding and concluding the policy “doesn’t work” because nothing was blocked. Check the Policy sync status column first a device showing “Not updated” has not yet received the current policy and will not enforce it.
Configuring Browser Restrictions
Endpoint DLP settings are configured under Settings → Data Loss Prevention → Endpoint DLP settings → Browser and domain restrictions for sensitive data.
This page controls two things: which browsers are allowed to interact with protected files, and which cloud service domains are blocked outright.
Unallowed browsers: Add browsers that should be blocked from accessing files protected by your policies. In this lab, Mozilla Firefox was added as an unallowed browser (executable: firefox.exe), so that any DLP-protected file opened in Firefox is blocked by policy rather than falling back to unmonitored access.
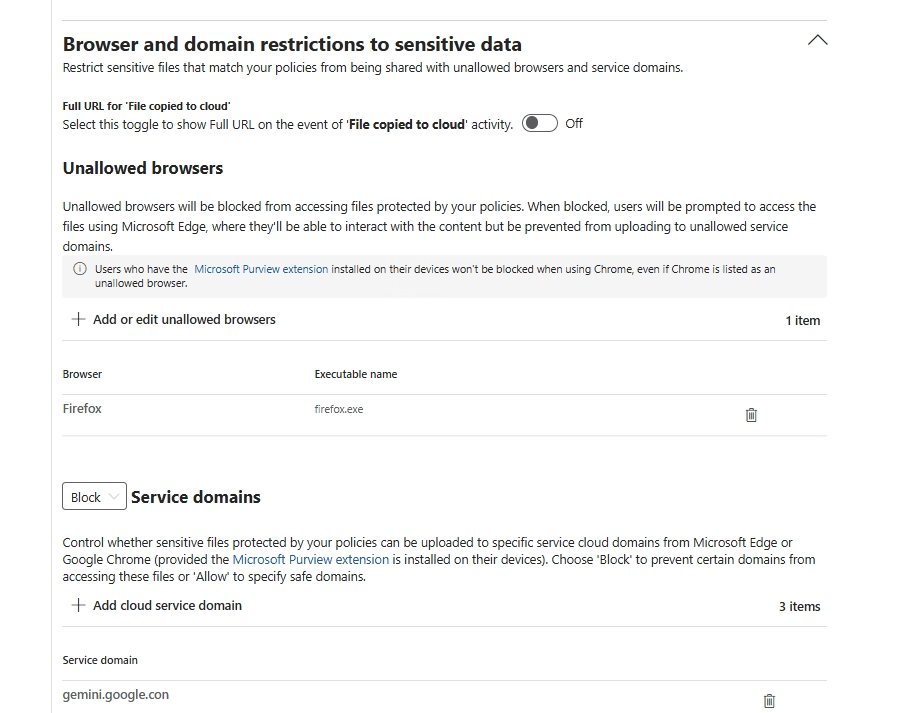
Users who have the Microsoft Purview extension installed on Chrome are not blocked when using Chrome, even if Chrome is listed as an unallowed browser — the extension provides the same inspection Edge provides natively. Firefox does not currently support the Purview extension, which is why it is a common choice for the unallowed browsers list in production environments.
Service domains: This section controls whether sensitive files can be uploaded to specific cloud service domains from Microsoft Edge or Google Chrome (with the Purview extension installed). Choosing Block prevents upload to the listed domains; choosing Allow instead defines a safe list.
Blocking Uploads to Generative AI Websites
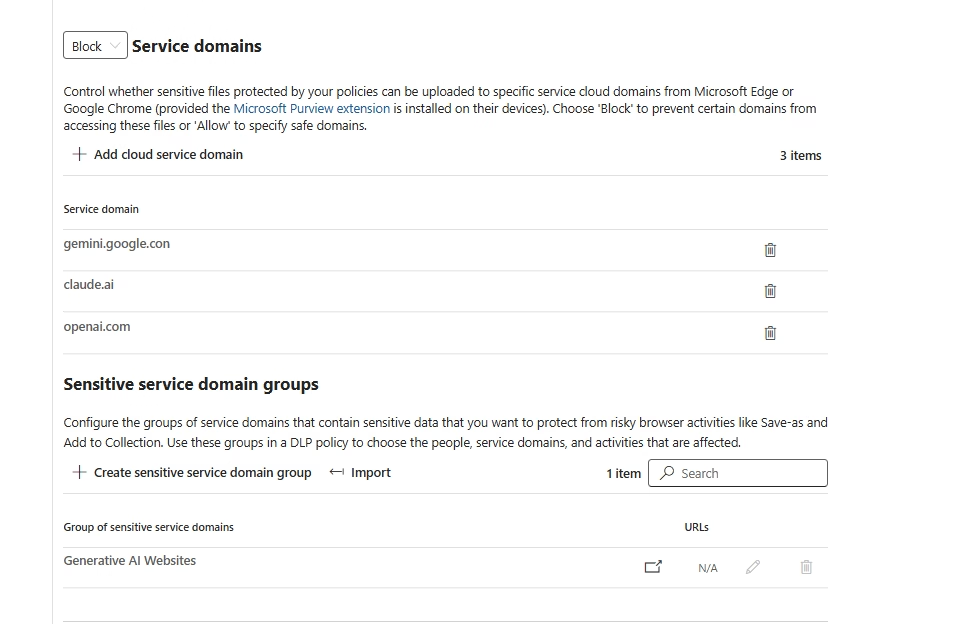
Microsoft provides a built-in Sensitive Service Domain Group named “Generative AI”, pre-populated with hundreds of known AI website domains (chatbots, AI writing tools, AI coding assistants, and similar services). Rather than manually listing every AI site, you assign this group an action directly.
- Go to Settings → Data Loss Prevention → Endpoint DLP settings → Browser and domain restrictions to sensitive data → Sensitive service domain groups.
- Confirm the built-in group “Generative AI Websites” is present (Microsoft maintains and updates this list; you do not manually add each AI domain).
- Open your DLP policy rule (the same Finance Credit Card Protection rule used throughout this series) → Edit rule → Actions → Audit or restrict activities on devices.
- Under Service domain and browser activities, enable Manage protected files access from unauthorized browsers and uploads to restricted cloud service domains, and set the action to Block.
- Click Choose different restrictions for sensitive service domains → Sensitive service domain restrictions → Add group → select Generative AI Websites → set Action to Block → Save.
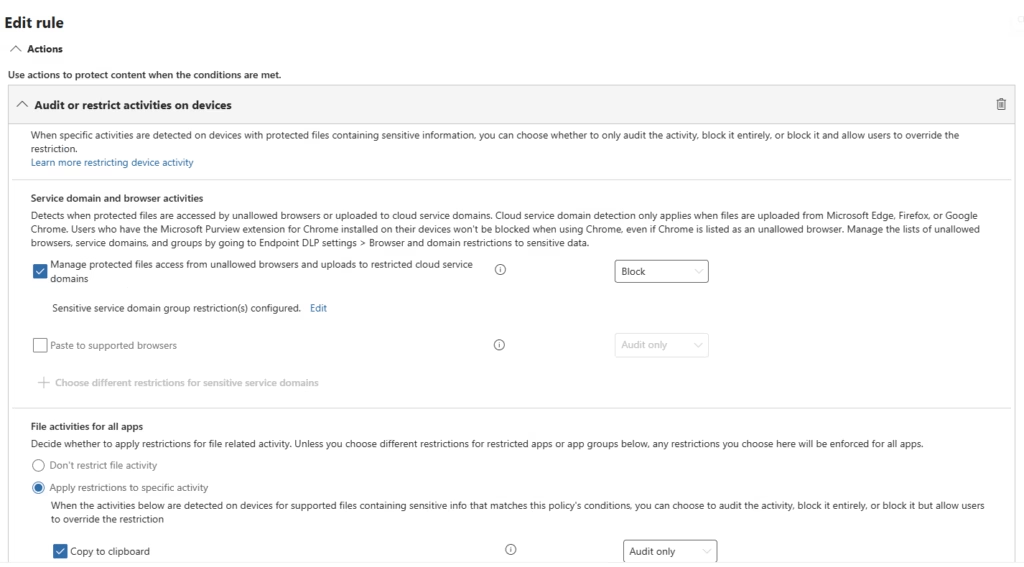
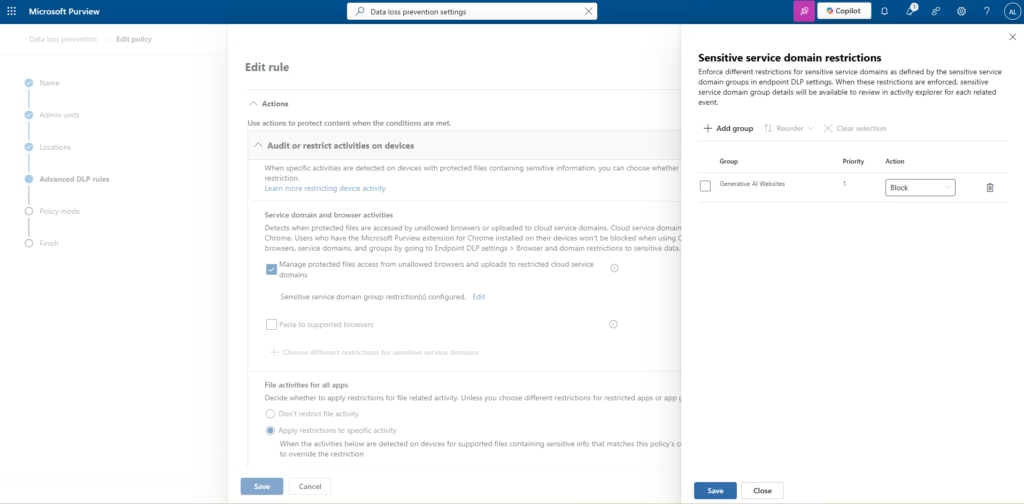
With this configuration saved, any protected file, meaning any file the DLP policy has flagged as containing a GSM match or a Credit Card Number match, is blocked from being uploaded to any domain in the Generative AI group, regardless of which specific AI site the user tries to use.
💡 Best Practice: Use the built-in Generative AI sensitive service domain group instead of maintaining your own list. Microsoft updates it as new AI tools appear; a manually maintained list will fall behind within weeks.
⚠️ Common Mistake: Assuming blocking Chrome and Edge is sufficient. Users with local admin rights can install unmanaged browsers. Pair browser restrictions with Unallowed apps and, where feasible, application control policies so unmonitored browsers cannot be installed at all.
Testing Methodology
Testing was performed end-to-end on a single Windows client already onboarded into Microsoft Defender for Endpoint, using the same GSM custom Sensitive Information Type built earlier in this lab.
Test steps:
- Confirmed the test device showed Configuration status: Updated and Policy sync status: Updated in Settings → Device onboarding → Devices.
- Created a test document (
GSM-Test.docx) in OneDrive containing the GSM keyword pattern that the custom SIT is configured to detect. - Opened a Generative AI chatbot in Microsoft Edge (with the Purview browser extension present) and attempted to upload
GSM-Test.docx. - Observed the upload result, the OneDrive policy tip on the file, the DLP alert generated in Purview, and the corresponding entry in Activity Explorer.
This mirrors a realistic production risk: an employee trying to summarize or analyze a confidential document using a public AI tool, unaware that the document contains data covered by an active DLP policy.
Validation and Expected Results
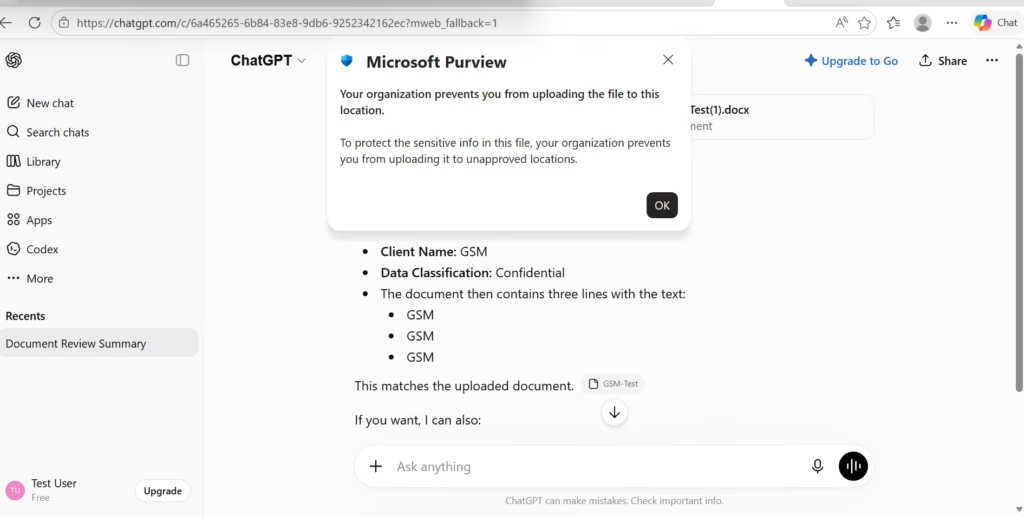
Upload attempt blocked by the browser. The AI website (accessed through ChatGPT in this test) returned a native blocking dialog: “Your organization prevents you from uploading the file to this location to protect the sensitive info in this file. Your organization prevents you from uploading it to unapproved locations.” This confirms the block is enforced by the Purview browser extension, not by the AI vendor.
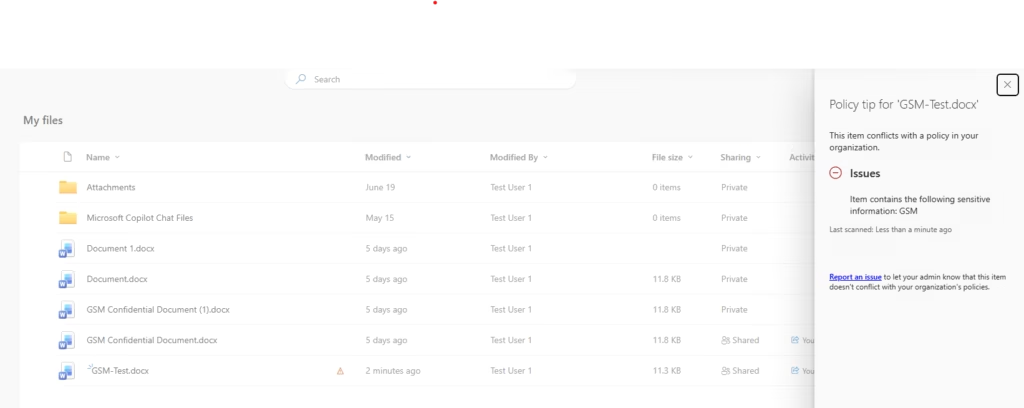
Policy tip on the file in OneDrive. The file itself shows a policy tip: “This item conflicts with a policy in your organization.” → Issues: The item contains the following sensitive information: GSM, confirming the custom SIT correctly classified the content, independent of the upload attempt.
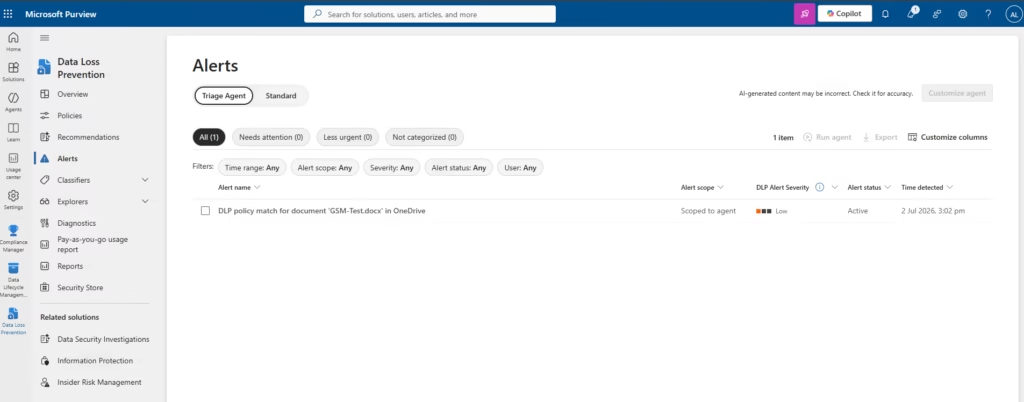
DLP alert generated. A new alert, “DLP policy match for document ‘GSM-Test.docx’ in OneDrive,” appeared in Data Loss Prevention → Alerts, scoped to the agent, with severity Low and status Active.
Activity Explorer captured the full event chain. Filtering Activity Explorer by date range showed the expected sequence for the test device: File created → File modified → File renamed → DLP rule matched, all tied to the same file path and user, all mapped to the Finance Credit Card Protection policy and the Financial rule.
Email alert delivered. A low-severity alert email from Office365Alerts was received, listing: Activity: DLPRuleMatch, Sensitive Data Detected: GSM Count: 1, High confidence, User, Policy Violated: Finance Credit Card Protection, File name, Rule actions: NotifyUser, GenerateAlert.
| Validation Check | Expected Result | Observed Result |
|---|---|---|
| Device policy sync | Configuration and Policy sync status both “Updated” | Confirmed |
| Upload to the Generative AI site | Blocked with native org policy dialog | Confirmed |
| OneDrive policy tip on file | Shows GSM as detected sensitive info | Confirmed |
| DLP alert generated | Appears in Alerts, scoped, Active | Confirmed |
| Activity Explorer event chain | File created/modified/renamed/DLP rule matched | Confirmed |
| Email notification | Low-severity alert with rule and file details | Confirmed |
This validation sequence device sync, upload block, policy tip, alert, Activity Explorer, email is the same sequence you should use to sign off Endpoint DLP in a production pilot before expanding to a broader device group.
Best Practices for Custom Sensitive Information Types
- Always test before deploying. Use the Test button on the Sensitive info types page to paste sample content and verify the SIT detects what you expect and doesn’t detect what you don’t.
- Add supporting elements for single-word keywords. Bare keyword lists without context match too broadly in real environments.
- Use High confidence as your default. Only drop to Medium or Low confidence if High confidence misses real data in your test samples.
- Name SITs for their data type, not their technical implementation. “GSM Subscriber ID” is better than “Keyword List v2 Final.”
- Review and update custom SITs annually. Internal data formats change. A SIT built for a 2024 employee ID format may miss the 2026 format entirely.
MS-102 Exam Tips
Scenario you’ll likely see: “An organisation needs to detect internal project codes in the format PRJ-XXXX in emails and Teams messages. Microsoft’s built-in Sensitive Information Types do not cover this format. What should the administrator configure?”
Correct answer: A custom Sensitive Information Type using a regular expression pattern, added as a condition in a DLP policy Not: A built-in SIT (these cover standard global data formats, not proprietary codes) | A sensitivity label (labels classify files, not detect content patterns) | A retention policy (retention manages lifecycle, not content detection)
Remember: Custom SITs = detect proprietary data. Built-in SITs = detect standard regulated data. Both work identically inside DLP rules once configured.
Also know for the exam:
- Custom SITs support three primary element types: keyword lists, regular expressions, and Exact Data Match (EDM)
- EDM requires uploading a schema and a data file, it matches against exact values from a provided dataset, making it the most precise (and most complex) option
- Activity Explorer is under Data Loss Prevention → Activity Explorer, not under Audit
- Simulation mode results appear in Activity Explorer under the “DLP rule matched” activity filter
- You must have Compliance Data Administrator or above to create custom SITs
FAQ
Q: How long does it take for a custom SIT to become available after creation?
A: Typically 10–30 minutes. The SIT must propagate through Purview’s classification engine before it appears in policy condition search results. If it doesn’t appear after 30 minutes, try refreshing the Sensitive info types list.
Q: Can I use a custom SIT in multiple DLP policies simultaneously?
A: Yes. A custom SIT is a tenant-wide resource once created, it’s available in every policy, every rule, and every workload across your entire Microsoft 365 environment.
Q: What is the difference between a keyword list and a regular expression in a custom SIT?
A: A keyword list matches exact words or phrases you specify (case-insensitive by default). A regular expression matches patterns structures like EMP-\d{4}-\d{5} that detect variable data following a specific format. Use keyword lists for fixed terms; use regex for structured codes with variable digits.
Q: What is Exact Data Match (EDM) and when should I use it?
A: EDM matches content against a specific dataset you upload for example, a CSV file of actual employee IDs or patient record numbers. It is the most precise detection method because it only matches exact values from your data, not just pattern shapes. Use EDM when false positives from regex or keyword matches are unacceptably high, or when you need to detect specific known values rather than formats.
Q: How do I know if my simulation results are accurate enough to switch to enforce mode?
A: Review Activity Explorer for at least 7 days. Look for: consistent match volumes (not spiking unexpectedly), matches concentrated in expected locations (finance SharePoint, not HR), and a false positive rate below 5% based on your sample review. When results are predictable and manageable, enforcement is safe.
Conclusion
You’ve built a custom Sensitive Information Type that extends Microsoft Purview’s detection beyond its built-in library, added it to a DLP rule alongside a built-in SIT, and learned how to use Activity Explorer to evaluate simulation data before going live. These are the skills that separate a basic DLP deployment from one that actually protects your organization’s unique data.
In Part 3, you’ll learn how to configure DLP Alerts so administrators are notified immediately when high-severity matches occur, how to read DLP Reports for compliance evidence, and how to safely switch your Finance Credit Card Protection policy from Simulation mode to full Enforcement.
Related Posts in the MS-102 Series
- Part 1: Microsoft Purview DLP Policies: Proven MS-102 Lab Guide (2026)
- Part 3: Monitor and Alert on DLP Policy Matches MS-102 Guide (2026)
- Related: Microsoft Purview Sensitivity Labels MS-102 Lab Guide
- Related: Microsoft Purview Audit Logs MS-102 Lab Guide
- Related: eDiscovery in Microsoft Purview: Proven MS-102 Lab Guide (2026)
Official Microsoft Reference: Create custom sensitive information types — Microsoft Learn
2 thoughts on “Custom Sensitive Information Types: Proven MS-102 Lab (2026)”