
Safe Links in Microsoft Defender provides a critical layer of ‘Time-of-Click’ protection that traditional email security often misses. Attackers use phishing URLs, shortened links, QR codes, and delayed redirection techniques to bypass traditional email security.
This is where Safe Links in Microsoft Defender for Office 365 becomes one of the most powerful security features for Microsoft 365 administrators.
If you are preparing for the MS-102: Microsoft 365 Administrator certification, understanding Safe Links is essential because it plays a major role in email protection, threat prevention, and Microsoft Defender policy management.
In this guide, we’ll cover:
- What Safe Links is
- How URL protection works
- Why Safe Links matters
- Step-by-step configuration in security.microsoft.com
- Best practices for production environments
- MS-102 exam tips
Learning Objectives
After completing this guide, you will be able to:
- Explain the concept of ‘time-of-click’ protection in Safe Links.
- Describe how Safe Links protects against malicious URLs.
- Configure Safe Links policies in the Microsoft Defender portal.
- Differentiate Safe Links from Safe Attachments.
What is Safe Links in Microsoft Defender for Office 365?
Safe Links is a feature in Microsoft Defender for Office 365 that provides time-of-click URL protection.
It protects users by checking links when they click them, not just when the email is delivered.
Safe Links protects URLs inside:
- Email messages
- Microsoft Teams chats
- Office documents
- Microsoft 365 collaboration apps
This helps defend against:
- Phishing attacks
- Credential theft
- Malware delivery
- Business Email Compromise (BEC)
- Zero-hour attacks using delayed malicious redirects
Why Safe Links Matters
Traditional spam filters only scan links when an email arrives.
But attackers often use delayed attacks.
Example:
An email contains:
https://trusted-login-example.comAt delivery time, it looks safe.
Two hours later, the destination changes to a fake Microsoft 365 login page.
Without Safe Links:
User clicks → credentials stolen.
With Safe Links:
Microsoft checks the URL at click time → attack blocked.
This is called: Time-of-Click Protection
And it is one of the most important reasons organizations deploy Defender for Office 365.
How Safe Links in Microsoft Defender Protects the Click
The core mechanism of Safe Links in Microsoft Defender is URL rewriting, which ensures every click is inspected against real-time threat intelligence
Step 1: Email Arrives
An email enters Exchange Online containing URLs.
Example:
https://example-login.comStep 2: URL Rewriting
Safe Links rewrites the original URL into a Microsoft-protected URL.
Example:
Original:
https://example-login.com
Rewritten:
https://nam01.safelinks.protection.outlook.com/...This enables Microsoft to inspect the destination during user click events.
Step 3: User Clicks the Link
When the user clicks the link, Microsoft checks:
- URL reputation
- Known phishing indicators
- Malware hosting reputation
- Threat intelligence feeds
- Real-time detonation analysis
Step 4: Safe or Blocked
If Safe
The user proceeds normally.
If Malicious
Microsoft displays a warning page and blocks access.
Admins can investigate through Defender alerts and reports.
Step-by-Step Guide: Configure Safe Links in security.microsoft.com
When you configure Safe Links in Microsoft Defender, you are enabling a proactive shield that extends beyond the inbox into Teams and Office apps.
This is the most important section for both real-world admin work and the MS-102 exam.
Step 1: Open Microsoft Defender Portal
Go to: Microsoft Defender Portal
URL: security.microsoft.com
Sign in using:
- Security Administrator
- Global Administrator
- Exchange Administrator (depending on permissions)
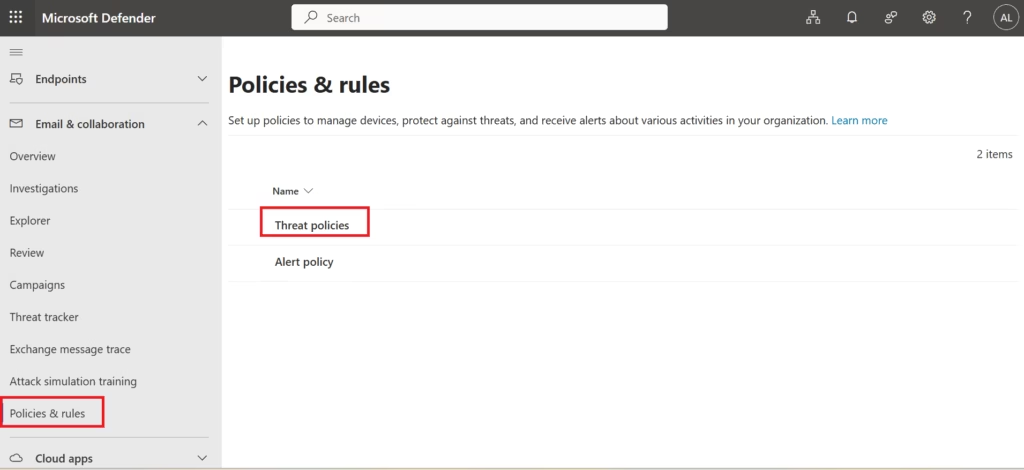
Step 2: Navigate to Policies & Rules
From the left menu:
Email & Collaboration
→ Policies & Rules
→ Threat Policies
Step 3: Open Safe Links Policy
When you select 'Create' to build a custom policy, you are defining how Safe Links in Microsoft Defender will intercept signals from specific users or groups.Under:
Policies
Select:
Safe Links
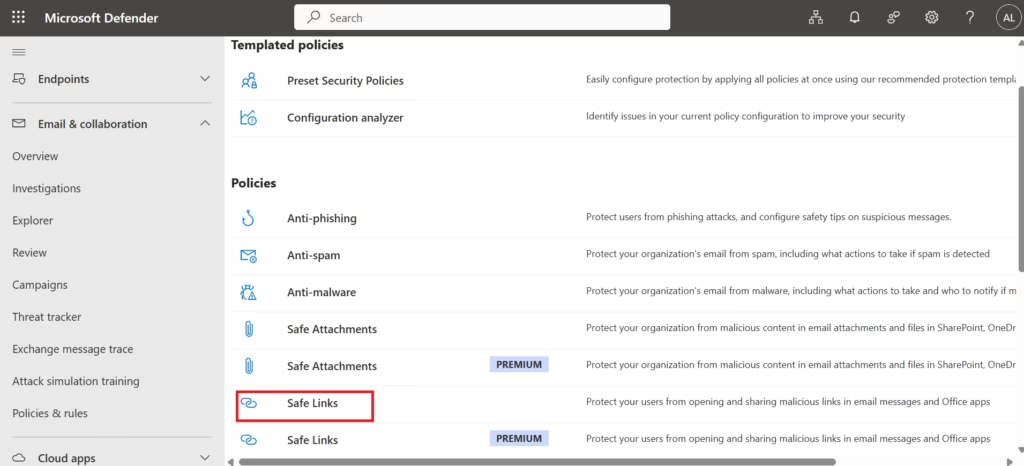
Here you will see:
- Built-in protection (Microsoft)
For production, using a custom policy is recommended.
Step 4: Click Create Policy
Choose:
Create
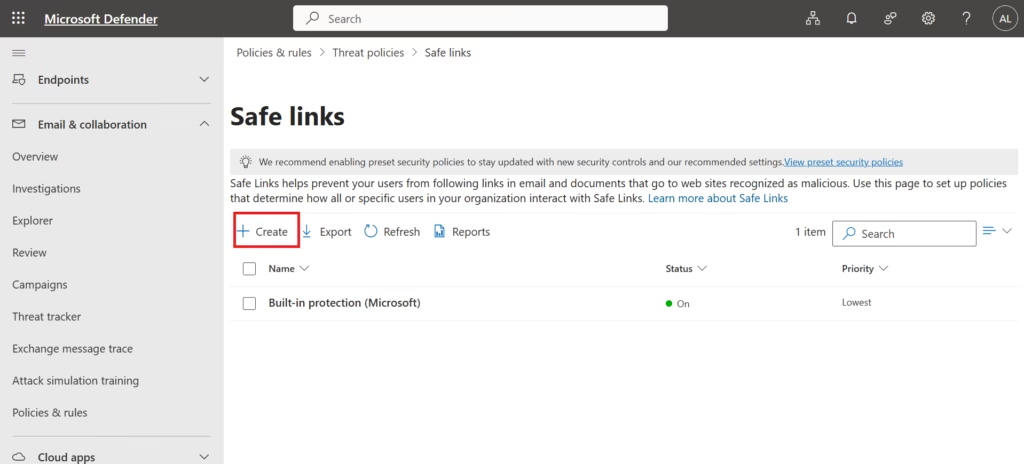
You’ll start the configuration wizard.
Step 5: Name the Policy
Example:
Corporate Safe Links Protection
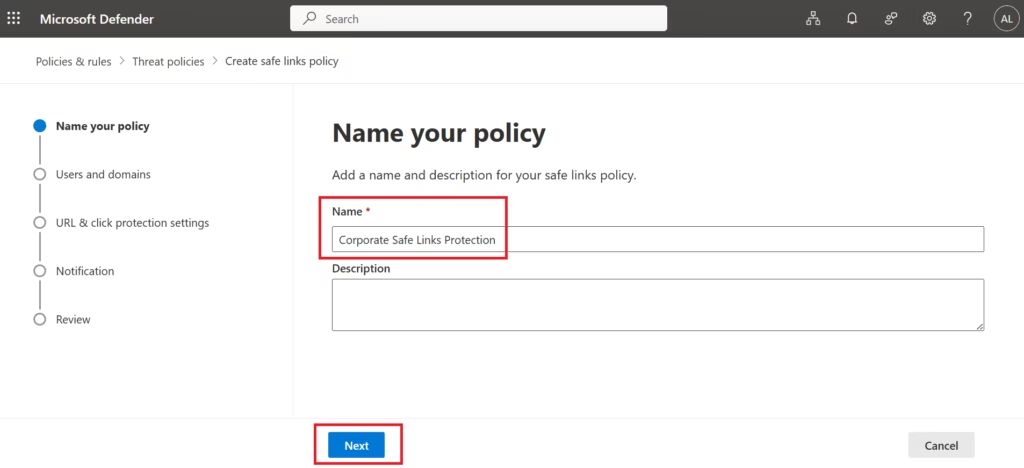
Add:
- Policy description
Good documentation helps during audits.
Step 6: Select Users, Groups, or Domains
Choose protection scope:
You can apply to:
- Specific users
- User groups
- Entire domains
- All recipients
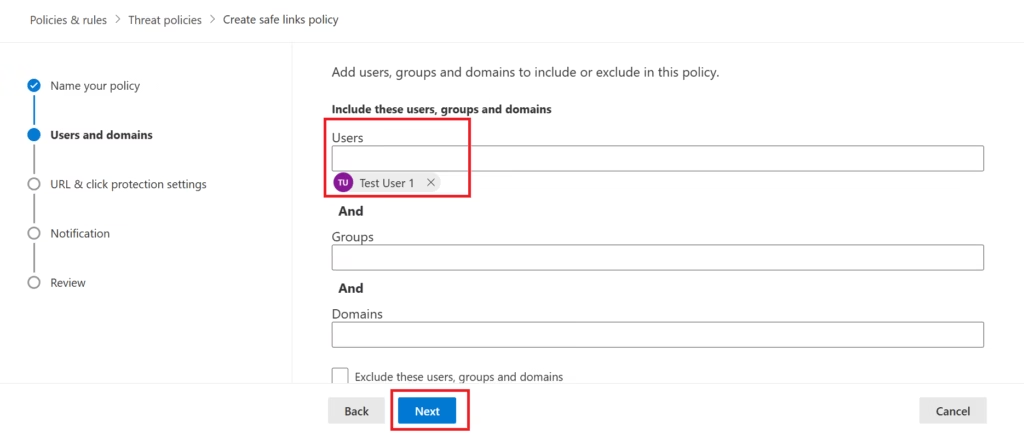
Recommended:
Start with pilot users first → then expand to all users.
Best practice for enterprise rollout.
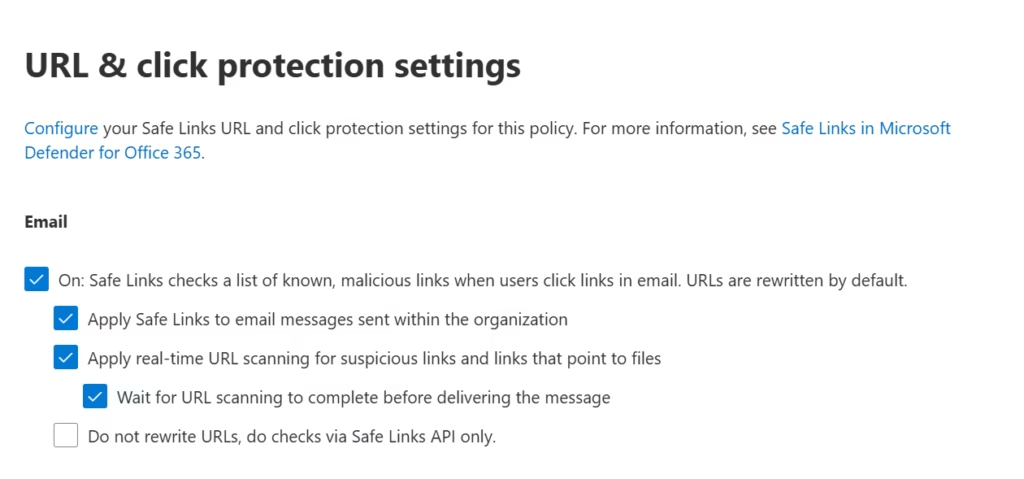
Step 7: Configure Safe Links Settings
Now enable the important options.
Recommended Settings
Email Protection
✅ Safe Links ON
This is the core protection.
Microsoft rewrites URLs and performs time-of-click analysis.
Must always be enabled.
✅ Apply Safe Links to Email Messages Sent Within the Organization
Many admins forget this.
Internal phishing from compromised accounts is very common.
This should stay enabled.
✅ Apply Real-Time URL Scanning
This helps detect suspicious links and links pointing to malicious files.
Strongly recommended.
Keep enabled.
✅ Wait for URL Scanning to Complete Before Delivering the Message
This improves security because Microsoft finishes the analysis before delivery.
A slight delay is acceptable for better protection.
Best practice for enterprise environments.
⬜ Do Not Rewrite URLs (Unchecked)
Leave this unchecked.
If enabled, Safe Links becomes weaker because URL rewriting is disabled.
You want rewriting enabled.
Correct choice.
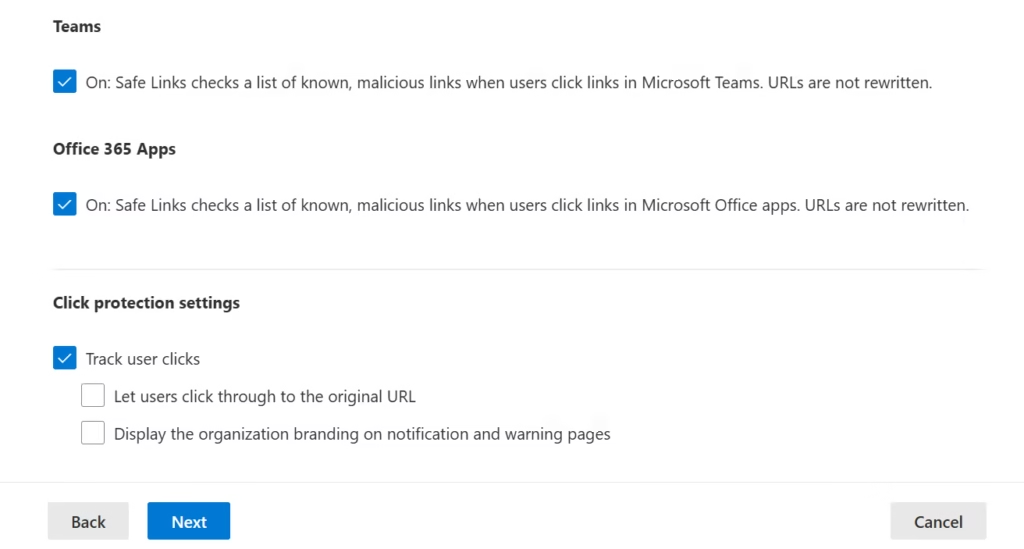
Teams Protection
✅ Safe Links for Microsoft Teams
Many organizations forget Teams.
Attackers do not.
This should absolutely stay enabled.
Office 365 Apps Protection
✅ Safe Links for Office Apps
Protects users when they click links inside:
- Word
- Excel
- PowerPoint
- Other Office apps
Very important.
Keep enabled.
Click Protection Settings
✅ Track User Clicks
Excellent choice.
This helps with:
- Incident response
- Threat hunting
- Security audits
- SOC investigations
Never disable this.
⚠️ Let Users Click Through to the Original URL
Depends on Security Policy
This is the only setting I would review carefully.
If enabled:
Users can bypass Microsoft’s warning page.
Risk:
Users may still click malicious phishing links.
My Recommendation:
For stronger enterprise security:
Consider disabling thisEspecially for:
- Finance teams
- HR teams
- Admin accounts
- VIP users
- High-risk departments
For normal users, strict blocking is usually safer.
⬜ Display Organization Branding on Warning Pages
Optional
Not security-related.
Mostly improves user trust and awareness.
You can enable this if your company uses branding standards.
Not mandatory.
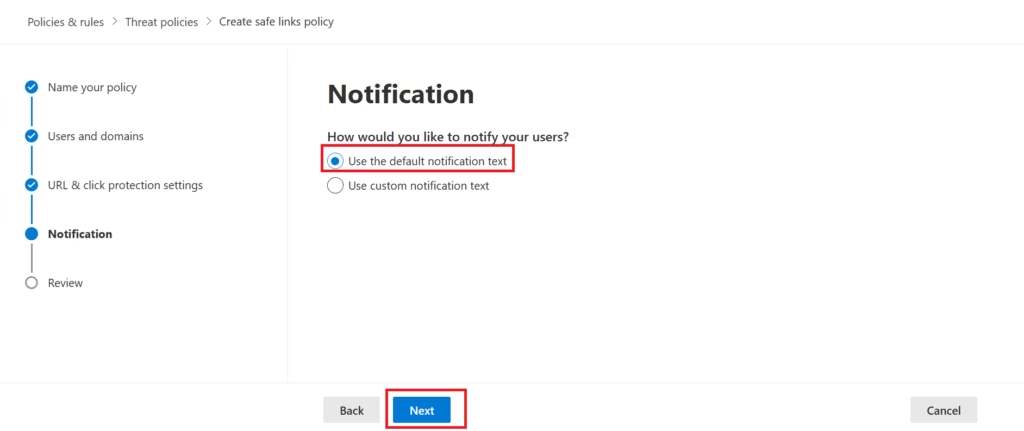
Step 8: Notifications
When a user clicks a malicious or suspicious link blocked by Safe Links in Microsoft Defender for Office 365, Microsoft shows a warning page.
This setting controls what message the user sees.
Example:
“This website has been classified as malicious and has been blocked for your protection.”
Use the Default Notification Text
Recommended for:
- Most organizations
- Standard enterprise environments
- Faster deployment
- MS-102 lab setup
- Small to medium businesses
- Admins who want Microsoft-managed warning text
Why is it good:
- Microsoft uses tested security messaging
- Clear and professional wording
- Less admin effort
- No risk of writing confusing custom messages
This is perfectly fine.
When to Use Custom Notification Text
Use Custom Notification Text
Recommended only if your company wants:
- Internal branding
- Company-specific security instructions
- Internal helpdesk contact info
- Security awareness guidance
- Compliance/legal wording
Example:
“If you believe this link is business-related, contact the IT Security Team at security@company.com before proceeding.”
This is useful in mature enterprise environments.
Step 9: Review and Submit
Review all configurations carefully.
Click:
Submit
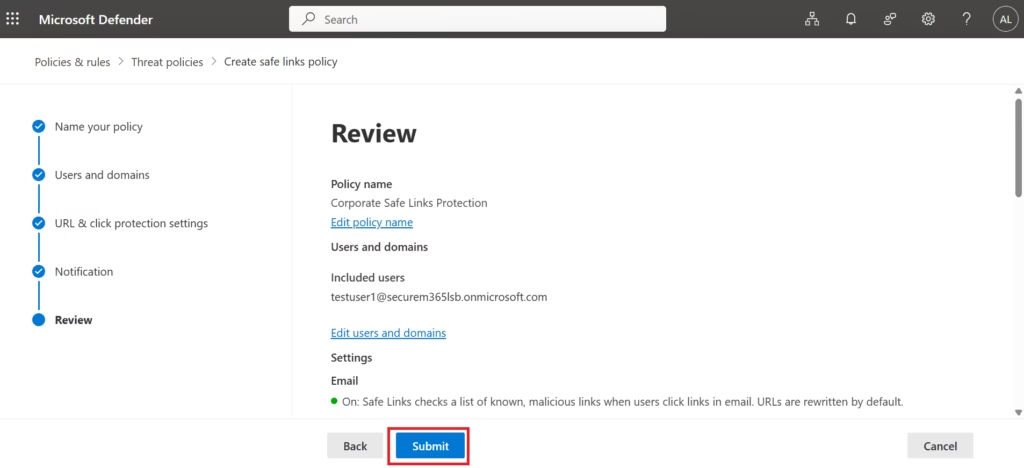
Your Safe Links policy is now active.
Policy propagation may take some time across Microsoft 365 services.
Step 10: Validate the Policy
Always test after deployment.
Recommended validation:
- Send a known test phishing URL
- Confirm URL rewriting works
- Confirm the warning page appears
- Verify click tracking logs
Never deploy security controls without validation.
Best Practices for Safe Links in Microsoft Defender Deployment
For a Senior Engineer, the most important part of Safe Links in Microsoft Defender is the ‘Track User Clicks’ feature, which is vital for post-incident forensics. I recommend:
Protect Internal Mail
Never trust internal email automatically.
Compromised accounts are common.
Keep Exclusions Minimal
Whitelist only verified business-critical applications.
Nothing more.
Protect Teams + Office Apps
Do not secure email only.
Secure collaboration platforms too.
Combine Safe Links + Safe Attachments
Best security comes from layered protection.
- Safe Links = URL protection
- Safe Attachments = file protection
Both should be enabled.
Monitor Click Reports Weekly
Security is not “set and forget.”
Review reports regularly.
Threats evolve daily.
Safe Links vs Safe Attachments
| Feature | Safe Links | Safe Attachments |
|---|---|---|
| Protects | URLs | Files |
| Detects | Phishing links | Malware files |
| Trigger Time | Click-time | Pre-delivery + detonation |
| Common Threat | Credential theft | Malware infection |
Both are part of Microsoft Defender for Office 365.
Licensing Requirements
It is a common MS-102 trap to assume all E3 licenses include Safe Links in Microsoft Defender; remember that Plan 1 or Plan 2 is required for this specific URL protection.
Safe Links requires:
- Defender for Office 365 Plan 1
- Defender for Office 365 Plan 2
It is not included in Exchange Online Protection alone.
This is a common MS-102 exam question.
MS-102 Exam Tip
Question example:
“A company wants to prevent users from accessing malicious links after an email is delivered.”
Correct answer:
Safe Links
Not:
- Anti-malware policy
- Safe Attachments
- Mail flow rule
- Exchange transport rule
This is a very common exam trap.
Senior Engineer Pro-Tip: On the MS-102, pay close attention to Internal Mail. By default, some admins think internal traffic is safe. Microsoft often asks how to protect against a compromised internal account sending phishing links to colleagues. The answer is enabling Safe Links in Microsoft Defender for ‘Email messages sent within the organization’.
Final Thoughts
Safe Links is not just another security feature.
It is one of the strongest protections against phishing, credential theft, and zero-hour URL attacks.
For MS-102 candidates, it is exam-critical.
For Microsoft 365 administrators, it is business-critical.
Because in modern cybersecurity:
One click can become one breach.
Safe Links helps stop that.
Configuring Safe Links in Microsoft Defender is the single most effective way to lower your organization’s risk of credential theft.
Next in the MS-102 Security Series: Safe Attachments in Microsoft Defender for Office 365: File Protection Explained
http://techcertguide.blog/safe-attachments-in-microsoft-defender-guide
Because malicious links are only half the story, attachments are the other half.
Previous Topic
If you haven’t read it yet: Anti-Phishing Policies in Microsoft Defender: Essential MS-102 Lab Guide
Start from the Beginning
MS-102 Microsoft 365 Administrator Overview
https://techcertguide.blog/ms-102-microsoft-365-administration
Official Microsoft Reference
https://learn.microsoft.com/en-us/certifications/exams/ms-102CategoriesMS-102
2 thoughts on “Safe Links in Microsoft Defender: Essential MS-102 Guide & Lab”