Configure DKIM in Microsoft 365 to protect your domain from email spoofing and ensure message integrity. In this MS-102 lab guide, you will learn how to enable DKIM, configure DNS records, and understand how DKIM works with SPF and DMARC for secure email authentication.
Because even the best filtering policies are stronger when the sender itself can be verified.
This is where DKIM, DMARC, and SPF in Microsoft 365 become critical.
These DNS-based trust mechanisms help prevent:
- Email spoofing
- Domain impersonation
- CEO fraud
- Business Email Compromise (BEC)
- Phishing attacks using fake sender domains
For anyone preparing for the MS-102: Microsoft 365 Administrator certification, understanding DKIM and DMARC is essential because they complete the full email security lifecycle.
In this guide, we’ll cover:
- What DKIM is
- What DMARC is
- How SPF, DKIM, and DMARC work together
- Step-by-step DKIM configuration in Microsoft 365
- DNS validation process
- DMARC monitoring and reporting
- Best practices for production environments
- MS-102 exam tips
Learning Objectives
After completing this guide, you will be able to:
- Explain the purpose of SPF, DKIM, and DMARC.
- Describe how these mechanisms work together to prevent spoofing.
- Configure DKIM in Microsoft 365 step-by-step.
- Identify common mistakes when configuring email authentication.
Why DKIM, DMARC, and SPF in Microsoft 365 matter?
Attackers often send emails pretending to be:
- Your CEO
- Finance department
- HR team
- Microsoft 365 admin
- Trusted vendors
Even if spam filtering is strong, domain spoofing can still succeed if sender authentication is weak.
Example:
Attacker sends:
ceo@yourcompany.com
But it is not actually from your CEO.
Without authentication:
Users trust it.
With DKIM + DMARC + SPF:
Microsoft can verify if the sender is legitimate.
This dramatically reduces phishing success.
What is SPF?
Sender Policy Framework (SPF) is a DNS TXT record that tells receiving mail servers: Which servers are allowed to send email for your domain
Example:
v=spf1 include:spf.protection.outlook.com -all
This helps prevent unauthorized mail servers from sending emails using your domain.
But SPF alone is not enough.
Because forwarding and spoofing tricks can still bypass SPF.
That is why DKIM and DMARC are required.
What is DKIM?
DomainKeys Identified Mail (DKIM) adds a digital signature to outgoing email messages.
This proves:
- The email is genuine
- The message was not altered in transit
- The sender is trusted
Microsoft signs outgoing emails using cryptographic keys.
Receiving mail servers validate the signature using DNS.
Think of DKIM like: A digital wax seal for your email
If the seal is broken → trust decreases.
What is DMARC?
Domain-based Message Authentication, Reporting and Conformance (DMARC) builds on:
- SPF
- DKIM
It tells receiving servers: What to do if authentication fails
You can instruct:
- None → monitor only
- Quarantine → send to spam
- Reject → block completely
DMARC also provides: Reports
These help admins monitor spoofing attempts and authentication failures.
This is powerful for security teams.
How SPF + DKIM + DMARC Work Together
SPF
Who is allowed to send?
DKIM
Was the message modified?
DMARC
What should happen if checks fail?
Simple Flow Example
- Email is sent
- Receiving server checks SPF
- Receiving server checks DKIM
- DMARC evaluates results
- Final action = Allow / Quarantine / Reject
This is a very common MS-102 exam topic.
How to Configure DKIM in Microsoft 365 (Step-by-Step)
In this lab, we will configure DKIM in Microsoft 365 by creating the required CNAME records and enabling signing for your domain.
This is your practical MS-102 lab section.
Step 1: Open Microsoft Defender Portal
Go to: Microsoft Defender Portal
Step 2: Navigate to DKIM Settings
Go to: Email & Collaboration
→ Policies & Rules
→ Threat Policies
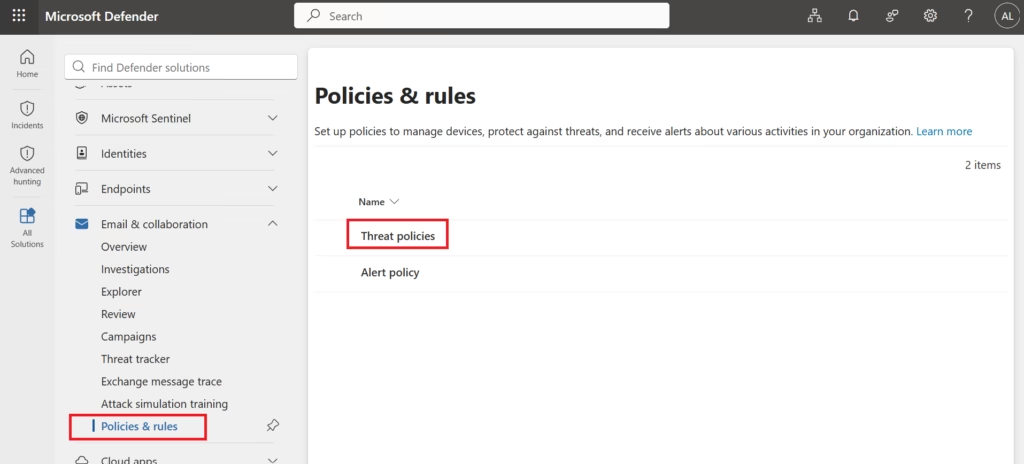
→ Under Rules → Email authentication settings

→ DKIM
Before you configure DKIM in Microsoft 365, make sure your DNS provider allows you to add CNAME records.
After adding DNS records, return to the portal to configure DKIM in Microsoft 365 and enable signing for your domain.
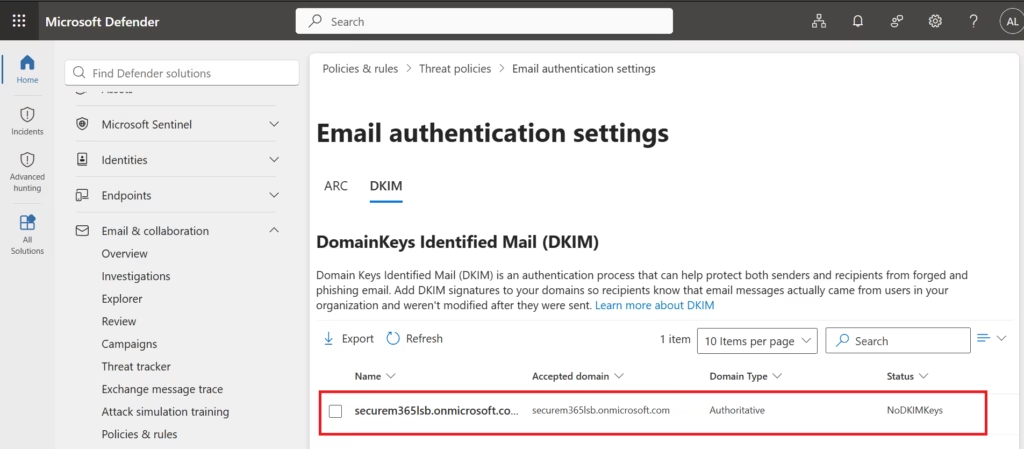
Step 3: Select Your Domain
Example: company.com
Status may show:
DKIM = No DKIM Keys saved for this domain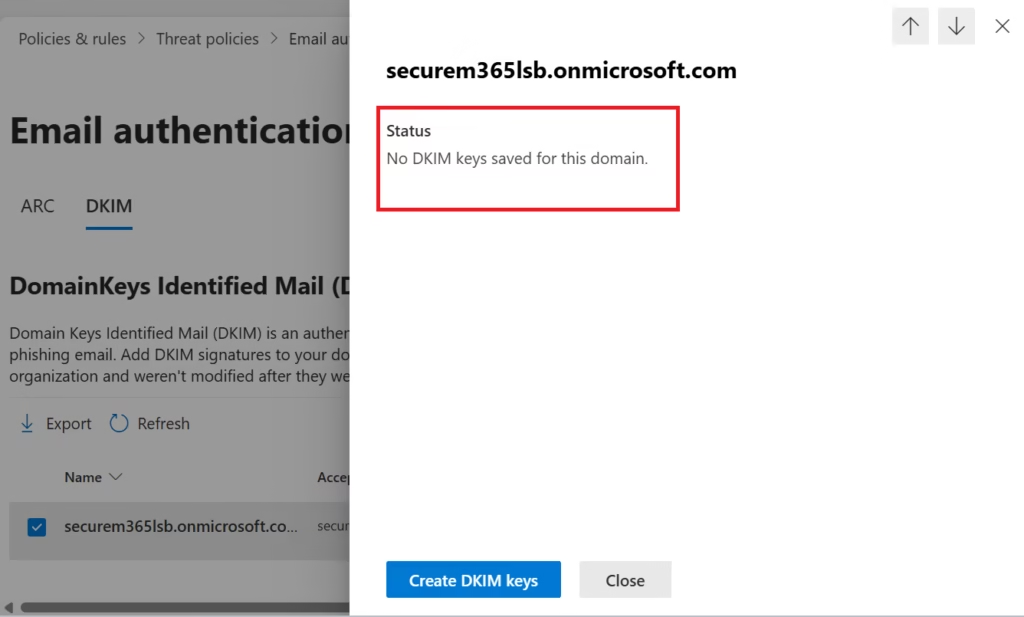
This is normal before DNS configuration.
Step 4: Generate Required CNAME Records
Microsoft provides two DNS records:
Example:
selector1._domainkey.company.com
selector2._domainkey.company.com
These must point to Microsoft-generated targets.
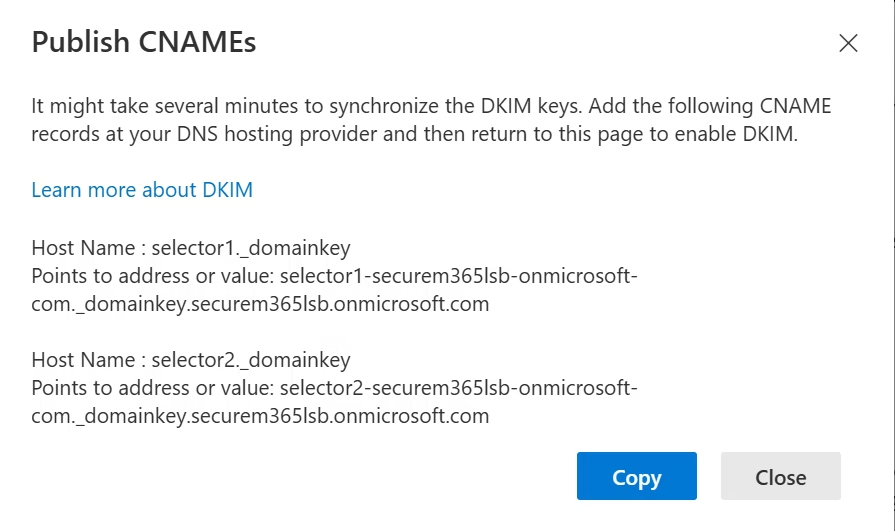
Example:
selector1-company-com._domainkey.tenant.onmicrosoft.com
selector2-company-com._domainkey.tenant.onmicrosoft.com
Do not copy examples; directly use your tenant values.
Step 5: Add DNS Records
Go to your DNS provider:
Examples:
- GoDaddy
- Cloudflare
- Namecheap
- Your hosting provider
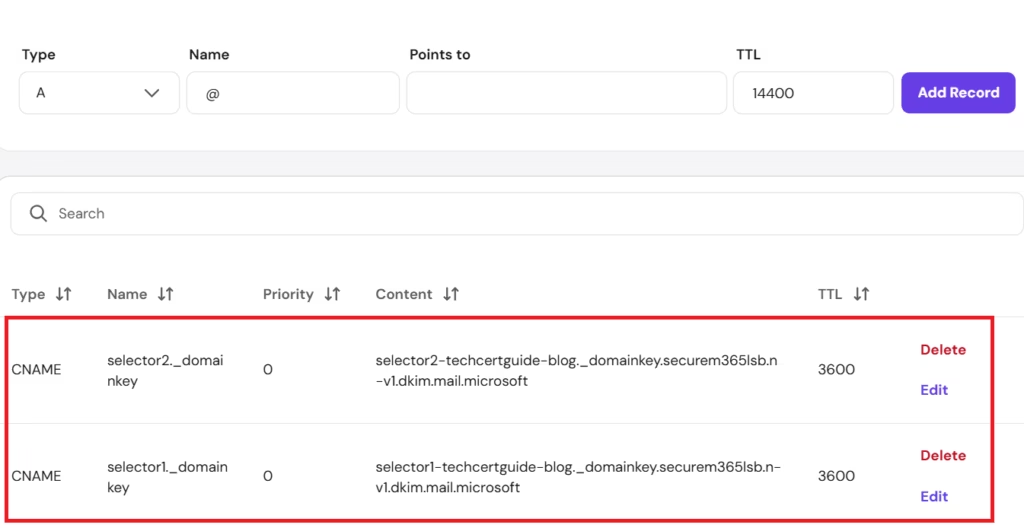
Add both CNAME records exactly.
Save changes.
Step 6: Wait for DNS Propagation
This may take:
- 15 minutes
- Several hours
- Sometimes 24 hours
DNS patience is part of every admin’s life 😄
Step 7: Enable DKIM
Return to Microsoft 365.
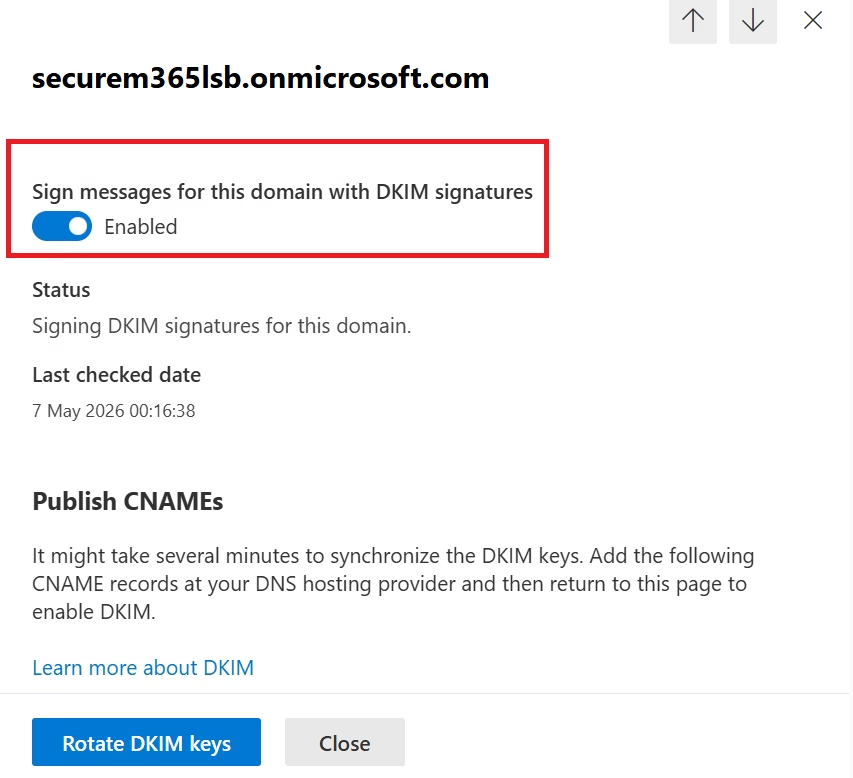
Click: Enable
If DNS is correct, DKIM activates successfully.
Now outgoing emails are digitally signed.
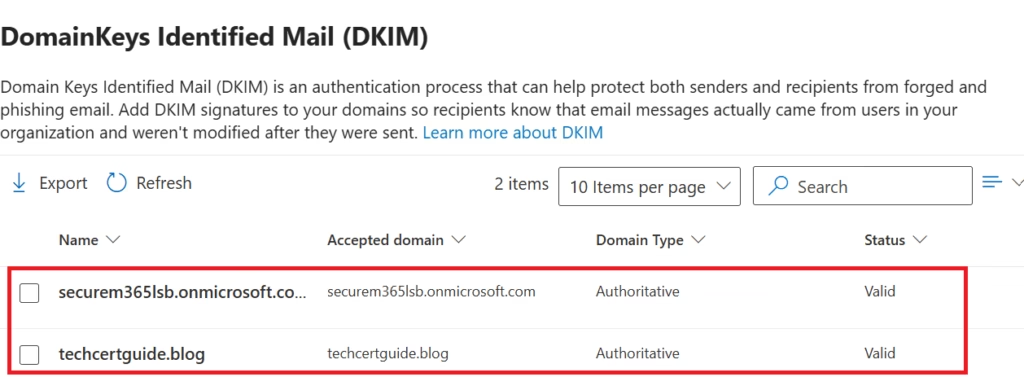
Step 8: Validate DKIM
Once you configure DKIM in Microsoft 365, validate the DKIM status to confirm that email signatures are working correctly.
Use:
- MXToolbox
- Microsoft message headers
- Mail flow analysis

Confirm:
DKIM = PassNever assume, always validate.
DMARC Configuration (Conceptual)
DMARC is created manually using a DNS TXT record.
Example:
_dmarc.company.com
Value:
v=DMARC1; p=none; rua=mailto:dmarc@company.com

This means:
- Monitor only
- No blocking yet
- Send reports to your mailbox
Recommended rollout:
Start with: p=nonethen move to:
quarantineThen finally:
rejectNever start by rejecting immediately.
That causes business pain.
A lot of it.
Best Practices from Real-World Infrastructure Teams
It is recommended to configure DKIM in Microsoft 365 for all production domains to improve email authentication.As a senior infrastructure engineer, I strongly recommend:
- Never Skip SPF
SPF is the baseline.
Always configure it first.
- Enable DKIM for All Production Domains
Especially:
- Primary business domains
- Executive domains
- Finance-relateddomains
- These are the top phishing targets.
Start DMARC SlowlyUse:
p=nonefirst.
Learn before enforcing.
- Monitor DMARC Reports Weekly
Spoofing attempts happen constantly.
Visibility matters.
- Protect Shared Domains Carefully
Third-party senders must be reviewed before strict DMARC enforcement.
Very important.
MS-102 Exam Tip
Scenario:
“A company wants to digitally sign outgoing email messages to prove authenticity.”
Correct answer:
DKIMNot:
- SPF
- DMARC
- Mail flow rule
Very common exam trap.
Scenario:
“A company wants receiving servers to reject emails that fail authentication checks.”
Correct answer:
DMARCNot DKIM.
Another favorite trap.
Common Admin Mistakes
- Starting DMARC with Reject Immediately
Dangerous.
Can break legitimate mail flow.
- Forgetting Third-Party Mail Senders
Applications like:
- CRM tools
- HR systems
- Marketing platforms
must be reviewed first.
- Enabling DKIM Without DNS Validation
It will fail.
Always validate first.
- Assuming SPF Alone is Enough
It is not.
SPF + DKIM + DMARC work together.
Always.
Final Thoughts
Configure DKIM in Microsoft 365 as part of your email authentication strategy alongside SPF and DMARC.
Spam filtering protects inboxes.
Safe Links protects clicks.
Safe Attachments protects files.
But:
DKIM + DMARC protect trust itself.They help ensure users can trust who an email claims to be from.
For MS-102 candidates, this is exam-critical.
For administrators, it is business-critical.
Because sometimes:
The most dangerous email looks the most legitimate.Authentication helps stop that.
Next in the MS-102 Security Series
Complete Microsoft Defender for Identity Lab Setup Guide
https://techcertguide.blog/microsoft-defender-for-identity-lab-setup
Because security does not stop at email, it starts with identity.
Previous Topic
If you haven’t read it yet: Microsoft 365 Anti-Spam and Anti-Malware Protection
Start from the Beginning
MS-102 Microsoft 365 Administrator Overview
https://techcertguide.blog/ms-102-microsoft-365-administration
Official Microsoft Reference
https://learn.microsoft.com/en-us/certifications/exams/ms-102CategoriesMS-102
3 thoughts on “Master DKIM in Microsoft 365: Complete Setup with DMARC & SPF (MS-102 Guide)”